Search the Community
Showing results for tags 'rebuild'.
Found 15 results
-
I finally got a chance to rebuild a transmission with a hi/low mechanism. This is a 6 speed #5060 transmission with the 10 pinion limited slip differential. Notice the brake shaft comes out the hole closest to the axle housing. The 8 speeds brake shaft comes out of the cluster shaft hole. I did a series of videos for this thread along with some pictures. The videos are split up between different phases of rebuilding...ie...the differential, the hi/low shift mechanism, the rest of the gears 1 & 2 (my batteries died in the camera). Most of the information will be in the videos...be advised that I did some struggling while doing these videos and I left them as is because it is not always easy. Hope this helps you guys. correction... According to the manual the bolts that hold the differential together are in backwards in the video. The nuts should be on the input shaft side (right side) of the transmission. Sorry, I missed that. Just got the trans split. I use a 1" old wood chisel to start and then work the case apart with a pry bar. A couple shots after getting the case half off...trans is in neutral. The trans case works as a work bench for the differential...very cool Here is the reason the trans needed to be opened. An axle gear lost it's teeth and the pieces were lodged in the pinions. Finished and back together. The rest are the videos...1st on is the differential... Next 2 are dealing with the hi/low mechanism...1st one taking apart and the 2nd on putting together...be nice...it was my first time. Now, 2 videos putting the rest of the trans together...batteries died just before I finished the first video. Thanks for looking
- 24 replies
-
- 11
-

-
- rebuild
- transmission
- (and 1 more)
-
my 1067 stopped moving; limited slip had worn out long ago; now input pully is turning , but tractor doesnt move --- very slight motion forward or backward if on level ground with no resistance. Enough to tell me shift lever is actually changing gears. I suspect input shaft woodruff keys but might be something worse ... i am interested in perhaps buying a new, used,or rebuilt transaxle if someone has one they would part with. And any advice on opening up the transaxle and looking inside . Or where i can find parts to rebuild it myself... ps i was on forum about 5 years ago, forgot my username so i joined again
-
My intent here is to show lots of pictures so if anyone is rebuilding one of these or some of the others...you can do it without fear and I am adding some very helpful information. I had a post that lead up to this that has some information in it also, and while it overlaps, I wanted to do the rebuild separate. This post is meant to be used with the manual...the pictures help explain better then the pictures in the manual. Now I want to share what I learned as I rebuild this...I realize that some have done this, but this was my first time (transmission virgin) and I know I am not the last one to do this. If I can help or make this easier, then I have given back a little from all the help I have received from this site. Here are a few shots of what this looked like whee I opened the trans. Notice the 1/4" ball bearings on some of the gears. Those are from the #1533 bearings. This is a shot showing gear placement in the left side of the case. Notice the bevel of the reverse gear (front right). The left side is the shallow side of the transmission halves. These are the parts of the differential..the 2 casings on the outside, the 2 axles, the differential bull gear, the 4 posts and the pinions that go on these, and the bolts and nuts that hold it all together. I can't get enough looks at the gears before I tear it apart...next 2 pictures are for future reference. I found a good assortment of 3/8 and 1/2 sockets that made fair to good arbors for pounding out and tapping in most of the bearings and seals. These are the bearings and seals you need to do the R&R. You can get all the stuff from Toro or the site that Jason gave in the related post. One note...the Toro#1303 seal is discontinued. This is called a cup seal, because it has a cup shape. I replaced it with a kind of match (SKF #7410) same dimensions but more like a regular oil seal...it will work. This place used to be Berry Bearings in Elgin...now it is "Motion Industries"...the web site MotionMRO.com...they can match up any bearing or seal. Excellent info. and prices were very good. Shot of the bearings and seals removed, cleaned and sanded. Used Valspar Restoration series...I like the red match with my 702 and I like the hardness of the paint. Showing bearings and seals installed...notice (arbors on right). Putting differential back together...show axle in place with bolts in place. Added pinion posts and in 2nd picture...added pinions (alternating one up and one down). Added Bull Gear Added other axle and case and bolted together. At this point, make sure you can rotate the axles...they should rotate in opposite directions. Placing input shaft and gear (one piece) and the reverse idler shaft. Installed the 2nd & high shift rail and fork. (one on the left). Also installed both ball bearings, spring and stop pin, and low & reverse shift rail. The 2 sliding gears were then placed...the grooves face each other and the smaller gear goes on the bottom. I had a pencil magnet that I used to hold the 2nd ball bearing, while I took an Allen wrench through the hole to hold the bearing out of the way while I placed the low and reverse shift rail. the picture also shows the reverse idler and brake shaft in place. Another view showing forks and gears. Showing reverse idler (bevel up...I hope) in front. Splined shaft installed through the shift fork sliding gears. The cluster gear is then installed( 2 wood-ruff keys here...one on each end). Also, the differential and axles are placed (note the nuts are facing up). different angle yet one more angle Put together..old 5 gal wood create works great as a work bench (all shafts fit through and keep work level). Used a hard rubber hammer to tap halves together. No leaks when I filled with 90wt gear oil...approx 1 1/2 qts. Checked shifting and started to put the 702 back together today. A final picture or a video tomorrow (hope). I want to thank Rickv1957 Fan, MikeRJ, Buckrancher,Suburban550,IndyWH Smokin'Joe, the Helmett and Charlie for all their help and advice...a huge thank you guys.
- 28 replies
-
- 10
-
-

-

-
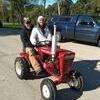
Starting a slow restore to a C-160, Today she got a new fuel tank, and different tires. Started it up and went for a ride under her own power, first time since '08. Next comes finding the fuel leak, looks like a bad hose. and maybe some cleaning of the oily parts.
- 12 replies
-
- 11
-
-
-
- making new again
- c-160 automatic
- (and 1 more)
-
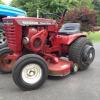
Good Morning everybody! I am in the process of sharpening the blades for my mowing deck (Model 78360 - Serial 7904987) and I noticed that the deck has a crack in it right where the bracket to the mounting hardware (to the tractor) is. SO I know I have to get that repaired. But while I was at this, I thought I could do a good quick once over on the deck to make sure I am ready for the season. What I would like to do is the following: Change the bearings for the spindles (or pack them with more grease) Get new rear tires (since they squeak) And that's about it If anyone here thinks I should do anything else, I would love to hear it! Where does everyone get the hardware (bearings, wheels for these rebuilds?)
-
HH100-115095B fuel pump I need a rebuild kit for this fuel pump does anyone know where to buy one. it bolts to the side of the engine
-
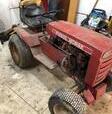
So this is my man's @Rp.wh12 hp '68? Raider that had a little mishap at my recent plow event. Good news here is the block was not ventilated so we think with a little coin and some greasy hands this motor can be saved. It seems that when a rod goes it will either punch the block or go the other way to the cam. Which is what it did breaking the cam. Note the indent on the fuel pump lobe where something wacked it. Piston shirt was busted up pretty good as it looks like the piston was slammed down on the crank. Wrist pin was ovaled and the whole bottom of the piston was mashed. This was done under a full load of dirt and plowing. @PeacemakerJack claims to have a video of when it went so perhaps he'll share here. I chewed my man's rear out about it running it low on low oil and tipped over in the furrow but he swears he topped it off before the day. I dunno but but not much oil came out and what did was sludge. Regardless damage is done so let's just fix it. New 10 over piston with rings is in order along with a new cam and 10 under rod. Bore is clean and not tapered so a std. piston and rings might be fitted in but is getting close to max out of tolerance so might as do it right. Obviously suffering from some low end lubrication issues.
-
Hello to all. I have a 1973 Wheel Horse 12 automatic in pretty good shape. It has been in continuous summer use since the day it was new. This machine is only used for lawn cutting in Wisconsin. It spends it's winters inside of a garage that is attached to my house. It has never been left outside when not in use. It has the famous Kohler K series engine, (K301). Other than a replaced fuel pump, and standard tune up items, this tough old engine has never been worked on internally. Over the last few years, I can tell it is has lost some power. It also has begun to use oil (sae 30w) at an increasing rate, Although no signs of smoking. It is also seeping some oil out of the governor shaft bushing. Because this is such a tough old tractor, and the fact that I have a spare hydro unit, I have decided to rebuild this engine. Heck, it's already got 43 years of use from this tough engine. I am not wanting to just "THROW some rings in there" and call it a rebuild. OH NO! I will do this the right way. I would love to just get a new Kohler short block and call it a day, but I know they are getting rare now especially trying to match up with my unique spec number. So I will have to do a complete tear down and rebuild. I will leave no stone unturned. I have no knowledge of machine shop procedures, but I should have no problem, to dissemble, clean, have machine shop work done, then reassemble. The reason I posted this, is to ask if anyone knows of a genuine small engine machine shop, without a bunch of high school kids learning how on my engine. I have tried in the past to have quality work done at machine shops, and I have discovered that with all my ignorance in this area, I was more informed than most of them. The one place I came to trust is long gone now. I always run this engine full blast when cutting the lawn (wide open throttle) that is why I would like OEM Kohler parts inside. I know getting OEM for something this old will not be easy, but I am much more concerned about finding a trusted and competent machine shop to do quality work. I can find do it yourself machine shop hacks anywhere, MOST of the members here are well informed, caring and dedicated folks who care about preserving the classic old Wheel Horse. Can you please give me your thoughts on undertaking this rebuild? Thanks so much
-
I just got a GT-14, and its clear it needs a bit of maintence and repair. I am thinking the first thing I should do is get the engine running smoothly. It bogs down and stalls if I open the throttle too far. So, I want to drain the tank, change the air filter, change the fuel filter and clean the carb this weekend. However, I am concerned about the availability of replacement parts and gaskets. I read the K321 manual about servicing the carbs and the only items it mentioned replacing were float nut gasket, the bowl ring gasket, the needles and seats, and the bowl baffle gasket. I was curious why there were no o-rings mentioned for the adjustment needles. Are there none? And where do you guys get replacement gaskets? I remember someone said that the float nut gasket can be gotten from a hardware store, but what about the bowl ring and baffle gaskets? My intention was to disassemble and soak the whole carb in aqua seal, but I don't want to dissolve any important rubber parts.
- 31 replies
-
- 1
-
-
- carb cleaning carb rebuild
- carb
- (and 4 more)
-
I have a Kohler k241 that I recently acquired. When I bought it I was told that it was rebuilt and bored .030 over. It came without head bolt and a head gasket, but there were 2 head studs in it. One came out relatively easily, but the other is pretty well stuck. I have tried penetrating oil and I do not want to heat it because it is right next to the exhaust valve. Would it be a big deal to just put a spacer on top of the place where the bolt head would go and just put a nut on it? Thanks
-
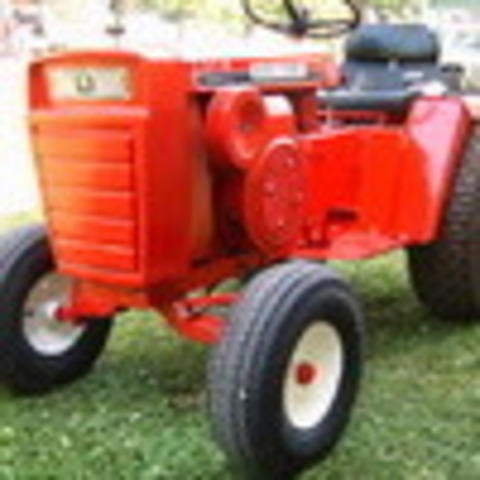
This is one of my better paint jobs and rebuilds. Hope you enjoy the pics This was 5yrs ago.
-
Anyone have any suggestions on carb, or general parts, cleaners? I had purchased a gallon can of cleaner with a tray that is really convenient, but it doesn't do a very good job of cleaning. Many years ago i used to buy a cleaner from a local auto parts shop that I think he bought in bulk, and then bottled in quarts. It almost looked like it had been used for something allready, If you let it set for a few hr's it would seperate into 2 very dirty looking layers. He wouldn't tell anyone what it was, or where he got it, but man did it work. You could put a carb, or anything else for that matter, in it for a couple of hr's and it came out looking NEW. Haven't found anything as good since. Any suggestions? Thanks!
-
I've had this B for quite a few years now, and it's been my constant go to, and ALWAYS starts and is able to do everything I need it to, even when ... it probably shouldn't - haha With that being said, it's time that my favorite gets some TLC. It's going to be slow going ... as I'm still using it as my go to tractor. Sheet metal first - then I'll do the frame and other bits while the motor is at the machine shop. Will be using Base/Clear urethane and High build primer (its much more forgiving on the small imperfections when I block it out to be sure its straight) Pictures! Started with the seat pan ... It is in great shape just the paint is WAY tired so I'm just hitting it with some 60 grit paper on the DA. Geno media blasted this hood for me a week ago, Sandblasting profiles the metal so I had to run the DA over it too, but it's come out alright ... there are quite a few dents that need to be fixed but nothing 'major' - unlike the original hood. It's just in a self etching primer to allow me to bodywork it. Stay Tuned for more!
-
So...my 1966 876 Wheel-A-Matic snapped a rod a number of months ago and I've been stumbling through the engine rebuild since. I think I'm finally seeing light at the end of the tunnel, but I may have finally gone in a little over my head. The connecting rod broke as a result of (or cause of) two worn crank bearings. I've removed the bearing plate side, but am a little apprehensive at what I'm seeing on the PTO side. The large valve/timing gear is blocking me from knocking the remaining crank bearing out. Is there any way of me getting that bearing out short of complete engine disassembly?
-
I'm looking for a little advise here. As mentioned in another post, the K-181 in my 1975 B-80 had massive internal failure. Initially, I thought the only damage was the rod and piston, but after a thorough cleaning and some additional inspection, I realized that there was a chunk missing from the bottom of the cylinder wall. I had one engine shop tell the me the damage is low enough and small enough that it shouldn't matter, however the machine shop was not so confident, basically saying it MIGHT be fine. That means I'm looking at $225 in machining costs plus about $150 in parts to repair an engine that may or may not be repairable. My initial thought was at that price point, it would be worth the relatively small investment to pick up a used block, but that got me thinking even further....if I'm spending the money anyway, what if I wanted to upgrade? I've done some searching here on the forum about engine swaps but I'm still a little unsure, so I apologize in advance if I'm asking a "what is the correct color" type of question! What I'm wondering: Is the K-241 (10 hp) or K-301 (12 hp) a direct bolt-on replacement for the K-181 (8 hp)? If not, what sort of mods am I looking at? What if it's not a Wheel Horse (Cub, Deere, Ariens, etc) engine? Is there a good resource for knowing which ones will work, or what to look for? In a related question, what if I purchase another K-181 block but it's from a non-WH machine, assuming I'm replacing all the guts, are the blocks fairly universal, or are they different depending on their original application? I welcome your comments and/or links to threads that have already covered these issues. Thanks in advance for your input! CB


.thumb.jpg.3e79b55863a9cd8efa48155bf4928236.jpg)