kpthorsefan 34 #26 Posted June 28, 2009 Hi Kevin, the 141 is looking really good .What colour paint are you using and where do you source you stainless steel fixings. I have just started to take apart the 512D so that wont see the light off day untill next spring.Keep up the good resto. Michael hi michael, i managed to find a good piece of paint work on a bracket on the tractor and took it to an auto paint mixing firm and had it matched and mixed, the stainless steel bolts i had a job with because they are unc threads, but i managed to find some on good old ebay, not cheap though. the pan head machine screws on it i replaced with M6 button socket screws and managed to re thread to 1/4 unc so they would still fit the spire clips, which i got from screwfix as well as the No 10 self tappers. the coach bolts are at the moment zinc plated but will try and re thread some metric ones, as i could not find any unc. the front tyres i want i cant seem to find here, there are some in the states at $140.00 a pair and about the same to ship here, so i am stuck at the moment on them. All the best on your restoration.. kevin Share this post Link to post Share on other sites
kpthorsefan 34 #27 Posted June 28, 2009 Not sure how to post more than one picture at one time? Share this post Link to post Share on other sites
TT-(Moderator) 1,127 #28 Posted June 28, 2009 Looking great, Kevin! Adding multiple pictures from a remote host such as Photobucket is as easy as pasting the image code of the first picture, hitting the "enter" key twice, and then pasting a second image (IMG) code from the next picture you want posted. If you don't hit "enter" twice between IMG codes the pictures will all be "stuck" together. Share this post Link to post Share on other sites
kpthorsefan 34 #29 Posted June 28, 2009 Looking great, Kevin! Adding multiple pictures from a remote host such as Photobucket is as easy as pasting the image code of the first picture, hitting the "enter" key twice, and then pasting a second image (IMG) code from the next picture you want posted. If you don't hit "enter" twice between IMG codes the pictures will all be "stuck" together. Many thanks terry, just had a practice run, " SORTED " :thumbs: Share this post Link to post Share on other sites
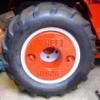
kpthorsefan 34 #30 Posted July 3, 2009 My new front tyres come yesterday, and i have just fitted them. had to make do with multi ribs because i could not get hold of any tri ribs which i really did want. Share this post Link to post Share on other sites
Wheel Horse Fan 3 #31 Posted July 3, 2009 It is coming out beatiful. Doing a top notch job. Can't wait to find an old C-series myself. Share this post Link to post Share on other sites
rickv1957 70 #32 Posted July 3, 2009 Your tractor is looking very nice!!!!,Rick :thumbs2: Share this post Link to post Share on other sites
Michael Bullington 5 #33 Posted July 3, 2009 Those rear tires rock! ..awesome job ...you have to do one these to appreatiate what goes in it! :thumbs: Share this post Link to post Share on other sites
bitten 133 #34 Posted July 7, 2009 Looking real good!!! Share this post Link to post Share on other sites
landsurveyor 2 #35 Posted July 7, 2009 Hey Kevin, I remember seeing your tractor for sale on ebay, I even had a bid on it Glad to see you are doing it justice. I cant find any 3 ribs in the UK either, multi ribs look pretty cool though. Keep us posted on your progress, VERY INSTERESTING (My charger is still in bits! - slow progress!). Simon Share this post Link to post Share on other sites
MikesRJ 552 #36 Posted July 7, 2009 VERY nice job kpthorsefan. It's coming along nicely. Can't wait to see it completed. Share this post Link to post Share on other sites
boovuc 1,090 #37 Posted July 7, 2009 Great looking machine, Kevin. I wish I was talented enough to do a frame off restore. H***.....I wish I was just talented in anything :thumbs2: Share this post Link to post Share on other sites
bo dawg 477 #38 Posted July 9, 2009 Looking SWEEEET Thats something I want to try this winter if I can get over being afraid to try. I need a system to remember how everything will go back together. My luck it will look like something from Frankensteins lab :thumbs: Share this post Link to post Share on other sites
kpthorsefan 34 #39 Posted July 9, 2009 Looking SWEEEET Thats something I want to try this winter if I can get over being afraid to try. I need a system to remember how everything will go back together. My luck it will look like something from Frankensteins lab hi bo dawg, i have had to scratch my head a few times to find out where some of the bits go, but i am lucky to have a C121 in the other garage to fall back on and see where bits do go, so far not had to look, but its not done yet ?. i must say i am enjoying doing it so it wont be my last. Share this post Link to post Share on other sites
kpthorsefan 34 #40 Posted July 9, 2009 Not done to much in the last few days, but i have fitted the footrests and re fitted the dash panel which i scratched and had to re spray. and i still cant find a steering wheel for it, the one on it i have patched with glass fiber & resin. Share this post Link to post Share on other sites
kpthorsefan 34 #41 Posted July 14, 2009 managed to bolt a few more bits on today and sprayed the hood last night, just got to let the paint set then that will go on. Share this post Link to post Share on other sites
jpmcleod 4 #42 Posted July 14, 2009 I have a C120 that I repainted several years ago. It looks great but it doesnt look any thing like yours. I am doing a frame-up restoration with my grandson on a Bronco 14. Spending more time on this one. Will have pic's of both in the near future. Share this post Link to post Share on other sites
chamjack 0 #43 Posted July 14, 2009 You are doing a great job. Keep the pics coming. Share this post Link to post Share on other sites
Mattbg79 1 #44 Posted July 15, 2009 Very nice work! Im at about the same spot on restoring my 520-H. Seems like the more i get done the more i cant wait to do. Just waiting on parts now :thumbs2: Share this post Link to post Share on other sites
Suburban 550 28 #45 Posted July 16, 2009 Nice job, Kevin. Lookin' real good. :thumbs2: Share this post Link to post Share on other sites
kpthorsefan 34 #46 Posted July 21, 2009 I have done a bit more today, got the seat fittings on and the hood, but i have got to rub the hood down and respray it, looks like an insect was on it before it had a chance to dry . Share this post Link to post Share on other sites
Doubletrouble 10 #47 Posted July 21, 2009 That's a great lookin job your doing. I love the look of the ag's on the rear the ribs on the front look good to. Your givin me ideas !! Keep up the great work and more pics please. Share this post Link to post Share on other sites