

-
Similar Content
-
 By Bill Winn
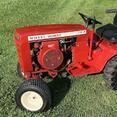
For sale. 1981 WH C-175 Kohler twin series 1
1. Tractor has brand new ag tires all the way around, brand new seat, new points and condenser, new rear blade quick attach bracket, lights have been rewired with LEDs, it has a brand new lift cable and bracket,seat pan is from a 410... it's surface rusted but at least it isn't busted up like the oem plastic one, starts and runs but smokes a bit on startup if it's been sitting for months but she runs smooth and strong.
2. Tiller is like new. It had been used only about once when I bought it and now it has been used 4 times more. Tines still have much of the factory paint on them.
3. 42" mower deck works perfectly, 4. snow blade was/ is rough but I repaired it so it is quite functional,
4. Brand new rear grader blade,
5. Wheel Horse brand plow,
6. Wheel Horse brand disc- I added a piece of motorgrader blade for a drag. I also welded a post to the top to hold weights,
7. Wheel Horse brand cultivator,
8. Home built furrower. (Makes good rows)
The original Wheel Horse plow/disc/cultivator originally came as a modular kit and in order to use it the draw bar and clevis hitch had to be swapped back and forth. (big pain) I fabricated draw bars and hitches onto each piece so this is no longer necessary.
I think this is a fair asking price at $2200 for all.
-
 By WH1618speed
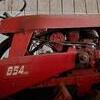
1965 Wheel Horse 855 with 42" blade and chains
Runs good
Sheet metal is very straight, great candidate for restoration.
Missing Belt guard
Will sell tractor by itself for $500 without blade and chains
Blade is straight and lots of cutting edge left... just a little rusty.
Text, call, or email with any questions. If you call and I don't answer please leave a voicemail with your name and number. Thanks!
I can also deliver to the big show in Arendtsville, PA... IF you prepay.
Facebook Marketplace link with more pics: https://www.facebook.com/marketplace/item/598023068755689?rid=229092436403311&ad_id&rt=1&refID=0&refType=0&referral_code=commerce_attachment
-
 By Joe Warren
New Old Stock Toro/Wheel Horse Blade Kit #117192
This kit contains three # 116207 blades
Diagonal length: 14”
Blade width: 2"
Center hole: 3/4” diameter
Used On: 42” Side Discharge Mower (1989 - 1992) Models: 05-42SY01, 05-42SY02, 05-42SY03, 05-42RY01, 78415, 38" Side Discharge Mower Model 05-38SY01
$49 per kit which includes shipping within US lower 48
Two kits available
Thank you
Joeww121@gmail.com
-
 By Marc M.
Hi guys I'm new to the wheelhorse world and i recently picked up a for 416-H and I'm looking to buy/install a plow put on it. I have found one on craigslist but I can't tell if it will work on my tractor or not, it is a wheelhorse plow though. Can somebody please send a photo or even a video of how to hook up a plow to a 416 or equivalent tractor?
Attached is my tractor and the plow I'm looking at. Will it fix and what's it missing ?!
-
 By T-Mo-(Moderator)
Drawing for both the short lift link, and the down pressure lift link for the front snow blade.
Short lift link 105052
Long lift link 7706 most likely replaced by 7706-01
I drilled 3/8" holes in the bar and used 3/8" x 2-1/2" Gr.5 bolts. Cut the threads off.
Weld the head of one bolt to the bar and try it for alignment. I ended up installing the 2nd bolt from the other direction and welding the head only. This provided 1/4" of offset and the pins are square to their attaching parts to minimise wear.
Drill holes in the bolts perpendicular to the bar for spring pins. Use a countersink to ease the edges of the holes.
With the holes drilled like they are you now know where they are and you can instal the pins blindfolded.
With manual lift the float is built in - everything floats including the lift handle.
With hydraulic lift the float is accomplished by connecting the bottom of the link to the slotted hole. Down pressure is still available when the pin hits the bottom of the slot.
Garry
-