cleat 4,936 #1 Posted April 9, 2016 Well, now that it is spring and although it seems to snow every other day, it does not accumulate much so.... Time to tear down snow blade and repair / rebuild / repaint / install new decals. Blade rotation handle has been built and painted already. Blade stabilizer has also been fabricated and painted where required. Blade partly disassembled and small parts bagged ready to be bead blasted and inspected. Pins are rusty and worn so I made up new stainless pins. Springs cleaned up and painted. Quadrant cleaned up but I found some broken welds. Welder in on Wednesday so will get fixed then. That's all for now. I will update as progress is made. 13 Share this post Link to post Share on other sites
doc724 924 #2 Posted April 9, 2016 Cleat-in the picture of the pivot sector, are those cracks in the weld? 2 Share this post Link to post Share on other sites
pfrederi 17,118 #3 Posted April 9, 2016 Is that original 5 position pivot? The intermediate holes look smaller Share this post Link to post Share on other sites
cleat 4,936 #4 Posted April 9, 2016 5 minutes ago, pfrederi said: Is that original 5 position pivot? The intermediate holes look smaller I drilled the intermediate holes. They are the same width but the original holes are oval shaped. 12 minutes ago, doc724 said: Cleat-in the picture of the pivot sector, are those cracks in the weld? Welder will fix that up for me next week then I can paint it. 2 Share this post Link to post Share on other sites
cleat 4,936 #5 Posted April 11, 2016 Well, I disassembled the blade itself removing the cutting edge and top support angle to release the plastic liner that someone has put on this blade. I found out why they installed this liner, the blade has at least two rust holes in it. These will get properly repaired then I need to decide whether I am going to re-install the liner or not. I then removed the skids that have been added. I think I will drill a series of holes so I can pin the skid at different heights VS using a stack of washers. The blade does not lift high enough to remove the skid and alter washer height. Oh well, a little disappointing but we will get it fixed up properly. 3 Share this post Link to post Share on other sites
cleat 4,936 #6 Posted April 11, 2016 (edited) Removed index pin and spring. Lift adapter crooked. Thicker spacer and now lift adapter is straight. Frame stripped down totally now. Just need to cut off that silly "S" shaped thing then clean, sand and paint. Edited April 11, 2016 by cleat 6 Share this post Link to post Share on other sites
squonk 38,844 #7 Posted April 11, 2016 Blades take a beating. It's good to take them apart every few years and give them the once over. I usually take off the cutting edge every year, wire brush the rust away, reprime and paint. Put on some Steppen Wolf and watch it dry! Only plowed once this year so I may not bother this go round 3 Share this post Link to post Share on other sites
cleat 4,936 #8 Posted April 11, 2016 This one is a blade I picked up with a trailer load of bits and pieces so I have no idea of it's past. It will have a more promising future though once I am done with rebuilding it. 4 Share this post Link to post Share on other sites
squonk 38,844 #9 Posted April 11, 2016 You should market those stainless pins in a kit. Mine were all rusty again. 2 Share this post Link to post Share on other sites
MWR 321 #10 Posted April 12, 2016 This plastic liner has my attention. Here in Tennessee, 8 inches of snow is regarded as a big snow. But sometimes the snow is real wet. And it tends to stick to the metal blade. And when it sticks, it doesn't slide off. You end up pushing so much snow you have to back up, drive around the pile and push it off to the side. I wonder if this plastic liner would shed the snow better. And if it would shed snow better, where would I find a blade liner? Of course, if I can't find one, I may just get out the turtle wax and wax the blade and see if that helps. 1 Share this post Link to post Share on other sites
cleat 4,936 #11 Posted April 12, 2016 Actually 8" of snow is fairly big here as well. I have no idea what the liner is. Possibly a piece of large sewer pipe ? Seems to be around 3/8" thick and follows the contour of the blade perfectly. I plowed some wet heavy snow this winter and the snow still stuck to it and got pushed up into large balls that then finally would roll off. It is hard to see, but the snow is in balls all along the driveway. I am hoping that cleaning and painting everything including the cutting edge will help. 2 Share this post Link to post Share on other sites
WVHillbilly520H 10,369 #12 Posted April 18, 2016 On 4/9/2016 at 0:47 PM, cleat said: Springs cleaned up and painted. Cleat, is it me or is 1(on the right) of those springs "bent" about 1/3 of the way from the end the coils look out of line, when I picked up my other 520 and the Dxi the xi came with a blade and ad soon as I unloaded it both springs broke and fell apart now I need new ones at least it happened before I was using it, hopefully yours is good,Jeff. Share this post Link to post Share on other sites
cleat 4,936 #13 Posted April 18, 2016 They are both bent around the same place. I attempted to straighten but they just kept springing back. Just cosmetic, they both appear to work just fine. Share this post Link to post Share on other sites
cleat 4,936 #14 Posted April 20, 2016 Quadrant has been welded up and painted. Skids have been drilled to pin into place instead of stacking washers. Fully retracted. Fully extended. 3 Share this post Link to post Share on other sites
elcamino/wheelhorse 9,021 #15 Posted April 20, 2016 Cleat , I keep following your projects and I am wondering "Is there any thing you can not do ?". Where do you find the time for all your projects? 2 Share this post Link to post Share on other sites
Phatboy 565 #16 Posted April 20, 2016 Cleat is the shizzle lol...i wish i had his talent and abilitys...he makes the best quality stuff i ever seen..im so jelly lol 1 Share this post Link to post Share on other sites
cleat 4,936 #17 Posted April 24, 2016 Frame has silly added on lifting hook removed then was sanded, primed and bottom side painted. I am off on Monday and Tuesday so if it does not rain then it will get the top side painted. 1 Share this post Link to post Share on other sites
cleat 4,936 #18 Posted April 25, 2016 Blade frame is completely painted. Once it is dry I will assemble everything but the actual blade which requires weld repair. Share this post Link to post Share on other sites
cleat 4,936 #19 Posted April 26, 2016 Frame completely assembled using stainless steel hardware. 4 Share this post Link to post Share on other sites
cleat 4,936 #20 Posted December 24, 2016 (edited) Blade has been welded up and painted. I don't have the painted pic taken yet. I don't know if I should re-install the plastic liner or not. What does everyone else think ? Here are some old pictures before disassembly showing liner. Here is a picture of the liner itself. Liner and top piece of angle iron adds some weight which may be beneficial. However, liner may contribute to rust. Cleat Edited December 24, 2016 by cleat Share this post Link to post Share on other sites
cleat 4,936 #21 Posted December 24, 2016 Well, the blade got the decals installed and then was assembled with the liner. Next will be to marry the blade to it's frame. Cleat 4 Share this post Link to post Share on other sites
JERSEYHAWG / Glenn 4,487 #22 Posted December 25, 2016 Cleat, every job you tackle you give it your best and it shows, top shelf. Glenn 1 Share this post Link to post Share on other sites
608KEB 794 #23 Posted December 26, 2016 Cleat, what are you using to paint your Parts? Spray gun, rattle can etc.... Share this post Link to post Share on other sites
cleat 4,936 #24 Posted December 26, 2016 Blade was just rattle cans from TSC. IH red. A lot of my parts are painted this way. Hoods and fenders get sprayed by my neighbor who also paints cars on the side. 1 Share this post Link to post Share on other sites
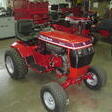
cleat 4,936 #25 Posted January 11, 2017 Finally got blade and frame married together. Frame is dusty from sitting in the garage. Ready to install once I get a tractor out of the storage garage. 2 Share this post Link to post Share on other sites