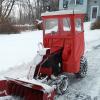
Theroundhousernr 589 #1 Posted March 15, 2016 ......what a little polish and buff wheel can do to tired old paint..... Still has a ways to go but should turn out pretty nice. 23 Share this post Link to post Share on other sites
elcamino/wheelhorse 9,029 #2 Posted March 15, 2016 Holy cow , why don't you come do to my house for a visit with your polish and buffer ,my El Camino is looking a little dull . 4 Share this post Link to post Share on other sites
953 nut 51,540 #3 Posted March 15, 2016 Looks like new. 3 Share this post Link to post Share on other sites
elcamino/wheelhorse 9,029 #5 Posted March 15, 2016 What kind of polish are you using? Share this post Link to post Share on other sites
Phatboy 565 #6 Posted March 15, 2016 Buddy a new set of decals and you would be all set !!! Nice machine !! 3 Share this post Link to post Share on other sites
JERSEYHAWG / Glenn 4,487 #7 Posted March 15, 2016 You have "the touch". Oh yea, don't forget the buffer and polish. Lookin sweet. Glenn 4 Share this post Link to post Share on other sites
Amcwheel85 2,058 #8 Posted March 15, 2016 That looks awesome! Guess I got to get a little buffer and do that to my 310-8 now! Make sure you post a fully finished tractor! 1 Share this post Link to post Share on other sites
Tankman 3,515 #9 Posted March 15, 2016 (edited) I use two grandsons; Wax On and Wax Off. We're saving electricity but go through a ton of chocolate cake, brownies, Whoppers, French fries, milk shakes, and Milky Ways. Edited March 16, 2016 by Tankman 16 Share this post Link to post Share on other sites
Theroundhousernr 589 #10 Posted March 15, 2016 I dont use the more expensive stuff that I use on my truck. I keep it simple and anyone can do what I just did. I have a random orbital buffer and a high speed buffer. Pads and all kinds cutting compounds. I like to keep it simple when polishing on the tractors but on my new 520H I might go all out....lol. If you hit one spot of oil or grease, it makes a mess really quick of the pads. Plus, on this tractor there is a few chipped paint, rust spots so that can cause issues to. So I go to the hardware store or auto parts store and pick up a few wool buffing wheels with the quarter inch shank. They are around six inches in diameter and cost a few bucks. Then I just use a standard electric drill or even my dewalt battery drill. Also, the paint must be clean of all dirt and grime. Just washing won't work. Clay bar is the best but with this one, I cheaped out and just used a good microfiber and some mean green and really worked small areas until I got it smooth enough that I felt I wasnt going to do more damage then good. To get an idea of the dirt in the paint, take a plastic bag in your hand and run it over the paint. On dirty paint it will sound like your using sand paper. First- always season the wool wheel with whatever you are working with. Make sure the compound is really worked into the pad. Second- Keep a spray bottle of water with you. Spray the paint with a mist and the wool wheel also. Little trick I picked up along the way. Helps to keep things lubricated/lift dirt and also streches the compound a little fruther. Third- Work in small 12"x12' areas or smaller. When you move to a new section, add three or four more drops of polish and a spritz of water. Fourth- Move very slow. About an inch per second or so. You can really cut into the paint even with a drill and wool pad. Be careful, things can get hot but with this setup, its pretty safe. Fifth- Keep a clean microfiber around and wipe as you go. Six- follow up with your favorite wax. So for under twenty bucks and a drill you can get results like that. There is minor scratches when shining under a flash light that could be done better with better prep work and compounds. But I have to admit, I think this one will be moving on down the road. I need space badly. To many tractors....or not enough space. 3 hours ago, elcamino/wheelhorse said: What kind of polish are you using? Actually, I used a left over bottle of meguiars scratch remover 2.0 . That stuff works great on old faded paint but again if I was doing something nicer, I would use a cutting compound to fit my needs. 11 Share this post Link to post Share on other sites
jackhammer 544 #11 Posted March 15, 2016 (edited) Looks Great On my 417 I've got a rubber seal around the inside of the bottom plate on the breather, Mines trashed. any idea of what I can replace it with?? thanks for the tips Rick Edited March 15, 2016 by jackhammer 1 Share this post Link to post Share on other sites
stevasaurus 22,229 #12 Posted March 15, 2016 That is the best explanation of the process that I have ever heard. Thanks for that. 6 Share this post Link to post Share on other sites
RedRanger 1,468 #13 Posted March 15, 2016 Great to see guys bringing back the original paint! I see too many people painting over it when it could be brought back easier, cheaper, and nicer. They're only original once. 4 Share this post Link to post Share on other sites
Theroundhousernr 589 #14 Posted March 15, 2016 I agree. Sometimes people strip off paint that can look like what I just did. Then you see them on the online add sites with over spray everywhere asking top dollar for a "restored" machine.... 8 hours ago, stevasaurus said: That is the best explanation of the process that I have ever heard. Thanks for that. I tried to type as much detail as I could but didnt want some huge post. Maybe if there is interest, I could type up a info page on it. There are a few things left out but its more common sense type stuff. Showing both the proper way to do it and the way I just did it on the 417A. I am no professional by any means and with detailing, everyone has their own tricks and ways of doing it. Maybe include a video to . Who knows... 9 hours ago, jackhammer said: Looks Great On my 417 I've got a rubber seal around the inside of the bottom plate on the breather, Mines trashed. any idea of what I can replace it with?? thanks for the tips Rick The original seal, I think was more like a foam or soft rubber. Honestly, I would use something like a thick roofing rubber and cut your own. Or even EPMD like pond liner. Both should work fine for that. If I think of something different besides off the top of my head, I will send you an email. 2 Share this post Link to post Share on other sites
ericj 1,576 #15 Posted March 15, 2016 Just washing won't work. Clay bar is the best but with this one, I cheaped out and just used a good microfiber and some mean green what is clay bar and i guess when you say microfiber you mean a shammy cloth or something simlar thanks i have several tractors that i would like to buff out eric j 1 Share this post Link to post Share on other sites
Theroundhousernr 589 #16 Posted March 15, 2016 11 minutes ago, ericj said: Just washing won't work. Clay bar is the best but with this one, I cheaped out and just used a good microfiber and some mean green what is clay bar and i guess when you say microfiber you mean a shammy cloth or something simlar thanks i have several tractors that i would like to buff out eric j Clay bar is literally a clay bar. Specially sold and used for removing dirt and grime imbedded in paint. You break it in pieces and once again work in small sections. They try to tell you to buy there lubricant which is also spray wax. I just use good soapy water. You keep the paint well lubricated at all times because the clay can actually scuff the paint if let go dry. You would be amazed how black the clay gets on even the best looking paint. Once black, you fold over and use it till you can't. Then rip off a new piece and keep going. It really works great. If the paint is to far gone, I would then suggest wet sanding. If you dont remove this fine grit in the paint, It will then swirl around with the polisher and create nice fine scratches. It will still shine but be full of scratches. I was able to work a lot of them out with a good microfiber cloth and some mean green on the 417. If going for perfection, clay bar is the way to go.. 4 Share this post Link to post Share on other sites
953 nut 51,540 #17 Posted March 16, 2016 Clay Bar is a wonder drug for paint problems. A few years back my wife came back from Florida with Love Bugs all over the hood of her car, she decided to use 409 cleaner to remove them and did it in full sun. The result was a haze over the paint that didn't want to come off with polishing compound or wax. About a half hour with Maguires Clay Bar and it was all gone, well worth the money. 2 Share this post Link to post Share on other sites
Pullstart 59,570 #18 Posted March 16, 2016 I looked up the clay bar on youtube, pretty cool stuff right there! Share this post Link to post Share on other sites
312Hydro 473 #19 Posted March 16, 2016 On March 15, 2016 at 0:03 AM, Theroundhousernr said: I dont use the more expensive stuff that I use on my truck. I keep it simple and anyone can do what I just did. I have a random orbital buffer and a high speed buffer. Pads and all kinds cutting compounds. I like to keep it simple when polishing on the tractors but on my new 520H I might go all out....lol. If you hit one spot of oil or grease, it makes a mess really quick of the pads. Plus, on this tractor there is a few chipped paint, rust spots so that can cause issues to. So I go to the hardware store or auto parts store and pick up a few wool buffing wheels with the quarter inch shank. They are around six inches in diameter and cost a few bucks. Then I just use a standard electric drill or even my dewalt battery drill. Also, the paint must be clean of all dirt and grime. Just washing won't work. Clay bar is the best but with this one, I cheaped out and just used a good microfiber and some mean green and really worked small areas until I got it smooth enough that I felt I wasnt going to do more damage then good. To get an idea of the dirt in the paint, take a plastic bag in your hand and run it over the paint. On dirty paint it will sound like your using sand paper. First- always season the wool wheel with whatever you are working with. Make sure the compound is really worked into the pad. Second- Keep a spray bottle of water with you. Spray the paint with a mist and the wool wheel also. Little trick I picked up along the way. Helps to keep things lubricated/lift dirt and also streches the compound a little fruther. Third- Work in small 12"x12' areas or smaller. When you move to a new section, add three or four more drops of polish and a spritz of water. Fourth- Move very slow. About an inch per second or so. You can really cut into the paint even with a drill and wool pad. Be careful, things can get hot but with this setup, its pretty safe. Fifth- Keep a clean microfiber around and wipe as you go. Six- follow up with your favorite wax. So for under twenty bucks and a drill you can get results like that. There is minor scratches when shining under a flash light that could be done better with better prep work and compounds. But I have to admit, I think this one will be moving on down the road. I need space badly. To many tractors....or not enough space. Actually, I used a left over bottle of meguiars scratch remover 2.0 . That stuff works great on old faded paint but again if I was doing something nicer, I would use a cutting compound to fit my needs. If there was a "thanks" button I'd press it for ya! Good detailing info is hard to come by. 3 Share this post Link to post Share on other sites
jackhammer 544 #20 Posted March 17, 2016 On 3/15/2016 at 4:40 PM, Theroundhousernr said: If I think of something different besides off the top of my head, I will send you an emai It would be appreciated, I'm leaning towards window or door draft stopper tape 1 Share this post Link to post Share on other sites