Jump to content
wheelhorse-c-161-1979

Auto 18. Help rewiring ignition after electric fire.

Recommended Posts

wheelhorse-c-161-1979

Well my '73 auto 18 was running great yesterday until the engine died and quit.  Next I see smoke rising from under the hood.  There was short in the wire harness and wire was burned right to the copper. I reached in and was able to stop the tractor from goin up in smoke. I just ripped out the shorted wire harness and it stopped.  So i took out the battery and went to work.

I looked at the wiring diagram, which seems straightforward until you try to match it up with the ignition switch.

After spending a couple of hours rewiring, I can not figure out which wire goes where in the ignition.

Can any one help me as I am totally at a loss.  The letters on electrical diagram  around the ignition sketch don't match anything i see on the actual ignition.

Would anyone be able to give me a hand. I don't need to compound problems by experimenting with wire combinations on the ignition.

Very grateful for any help.

Thank you.

Jack


wiring-auto18.jpg

auto-18iginition0.jpg

auto-18iginition1.jpg

Share this post


Link to post
Share on other sites
 
gwest_ca

Download this file
http://www.wheelhorseforum.com/files/file/1209-wh61-90-134-ignition-switches-1972-modelspdf/

The one you want is named
WH61-90 #134 Ignition switches 1972b.pdf

The original ignition switch 101917 was replaced by another shown on the last page. I think that will help and being in pdf format you can print out that page.

Garry

Share this post


Link to post
Share on other sites
 
wheelhorse-c-161-1979

Hi Gary,

Thank you so much for the quick reply!  Even though it's a 73', I guess '72 switch models being used would make sense.

I'm going purely by comparing visually the graphic to the actual ignition tab connectors. I guess this is the one that seems to best match up with what I have.

I just love this forum. It has helped me so much. It's wonderful :) I'll give it a shot putting the wires where they say they should. Hopefully it won't go boom!


XAUTO18.jpg

CORRECT-IGNITION.jpg

  • Like 2

Share this post


Link to post
Share on other sites
 
mikekot3

I like your quote in your signature line
 

  • Like 1

Share this post


Link to post
Share on other sites
 
gwest_ca

Once you get it figured out there is a connector available that takes the guess work out of it next time. This one is supplied by Stens
https://www.bantasaw.com/catalog/viewproduct.asp?i=205&p=3054
or it is available with wires in each cavity
https://www.bantasaw.com/catalog/viewproduct.asp?i=205&p=1326

If you don't like the wire color locations the terminals can be released and inserted where you want them. A 1/16" or 3/32" cotter pin opened up makes a good terminal release tool. Can explain how it is done if you don't know.
Napa also has this harness and they likely have the bare connector also.

Garry

Share this post


Link to post
Share on other sites
 
gwest_ca

The original 101917 ignition switch has been replaced by 92-6785 and here is the info on the replacement

92-6785 Ignition switch1 SS.jpg

92-6785 Ignition switch2 SS.jpg

  • Like 2

Share this post


Link to post
Share on other sites
 
wheelhorse-c-161-1979

Thank you gwest! Super helpful info. Gonna give it a try. Let you know if she comes back to life! 

  • Like 1

Share this post


Link to post
Share on other sites
 
wheelhorse-c-161-1979

Hi Gary,

Thank you so much for the quick reply. Even though it's a 73' I guess '72 switch models being used makes sense.

I'm going purely by comparing visually the graphic to the actual ignition tab connectors. I guess this is the one.  

I just love this forum. It has helped me so much. It's wonderful :) I'll give it a shot putting the wires where they say they should. Hopefully it won't go boom!


Well, guys thank you again for the help! Inside of a few minutes got the wires back in place on the starter and she started right up!

No way I could have done this without those helpful schematics. The owners manual just didn't cut it.

So thank you and best to all!
Jack

  • Like 1

Share this post


Link to post
Share on other sites
 

Create an account or sign in to comment

You need to be a member in order to leave a comment

Create an account

Sign up for a new account in our community. It's easy!

Register a new account

Sign in

Already have an account? Sign in here.

Sign In Now

  • Similar Content

    • Brandon Byers
      By Brandon Byers
      I know I'm half a year ahead of schedule! 

       
      I picked this 1974 D-180 up early last year. It had a pretty hard life, and the previous owner gave his best attempt at keeping it alive. Hydro was strong so I serviced it and put it to work mowing all year. I decided if it would make it through the season then it would get some TLC. By fall it was burning about a quart of oil an hour but it made it. I have no clue how many hours are on it, every hole, bushing, bearing on this tractor is pooched. If you look closely, somebody used two 1" NPT Pipe Flanges to rebuild the mounting points for the upper 3 point cylinder. Hey it works!
      I rebuilt the steering gearbox and re-bushed the front axle along with making new spindles. 
      I had the 482 Kohler bored .20 over (it was .10 over already) and gave it a rebuild with the intention of putting it back to work on snow duty. 
      I then dawned on me that this tractor will be 50 years old next year - and these old D's are becoming harder and harder to find anymore. So I decided to customize it a bit and go for what a maybe a dealership would offer for a 50th anniversary model if Wheel Horse was still in business today (In another universe, maybe!) 
       
      As D's aren't known for their looks - and I can't leave anything alone. I took approximately 2 Inches out of the grille and bezel. 
      I updated most of the wiring and lights. Gave it a new set of Carlisle Ags along with Vredestein front ribs. It got a new seat and I painted all the accents aluminum. 
      I patched, rebuilt the 48" deck and put new blades, wheels, and hardware on it. The Blade & 3 point scoop somebody adapted to it also got some attention.  
      Lastly I stripped it most of the way down and painted it with IH red acrylic urethane enamel. 
      I always forget to take pictures during my projects but here's a few: 
       
      Before: 


      After: 


      Thanks for reading!!
    • Hoppy Rabbit
      By Hoppy Rabbit
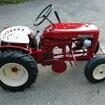
      I went to a wheel horse show in PA and picked up a B-100 Automatic. I restored and cleaned it up after I brought it home. It had everything except the Headlights. I got a lense and looked online for the housing and cable. I found one on ebay except it was $67 plus shipping. It didn't even have all the parts. https://www.ebay.com/itm/265133794229?mkcid=16&mkevt=1&mkrid=711-127632-2357-0&ssspo=dhBhG47STyW&sssrc=2349624&ssuid=&widget_ver=artemis&media=COPY.I was just wondering if there is anywhere to get a cheaper one with all the parts so I can finish it. 

    • Gingerbread
      By Gingerbread
      I’m new to this and not sure if I’m doing this right, But I have a 211-4 with a Briggs 11hp and the thing was sold in my town years ago when it was new. it was my grandfathers till now so it’s a nice piece of history. and it has some electrical problems I can’t figure out, It blows the 15Amp fuse as soon as you turn the key, it all started after the I had to replace the the ignition switch. And now it just blows the fuse. I messed with it when it happened but I have been away in the service for about two years, but now I’m on leave and want to fix my pride and joy but don’t know if my wires are all in the right spot. And my brother actually hooked the battery up backwards by accident for a few seconds while I was away so don’t know if that did anything. So any helpful suggestions or pictures for an example to look at. Thanks
    • Crazy Old Red Horse
      By Crazy Old Red Horse
      Barn find 1975 D180. 608 original hours. Tractor and 48” belly mower look to be still in their original paint. Rear 60” finish mower looks like it has had one coat of new paint added at some point. Open to trades. Please email me with any questions or for additional photos. 35 miles north of Pittsbugh.


    • illinibrew
      By illinibrew
      I have been into garden tractors for a few years.  Wanted to learn about small engines and buying an old sear suburban was cheaper than the class at the local community college.  Just got a 1980 C85 (with a johnny bucket on it).  
×
×
  • Create New...