Jparkes43 329 #126 Posted May 7, 2016 (edited) Yes good idea. I think a straight pipe should do that trick, the go kart engines are prone to shoot a flame or two any way. Shouldn't be to hard James Edited May 7, 2016 by Jparkes43 Share this post Link to post Share on other sites
Nathanielperz 150 #127 Posted May 7, 2016 Oh yeah thats true 1 Share this post Link to post Share on other sites
Jparkes43 329 #128 Posted May 7, 2016 so i think i may be able to get the carb dialed in and it will shoot as it needs adjusting any way but even still a straight pipe will sort that. james Share this post Link to post Share on other sites
Jparkes43 329 #129 Posted May 11, 2016 Hello. Here is a bit of an annoying update. Well the seller for the clips turns out to be a scammer so i'm either trying to get my items or get a refund. Will buy another set in the meantime so i can at leas get on with this build. James Share this post Link to post Share on other sites
Jparkes43 329 #130 Posted May 16, 2016 (edited) Hello all again, back at it again with some updates!! (this is quite a picture heavy update) Its been a little while but been at Work! got an exhaust made up that should sounds nice and clear the bonnet. will be all welded up this week so i will let you guys know when its done. Here is the progress. got the new flange, tube, and silencer from the old engine. i am going to keep the original honda exhaust and maybe do something with that if i'm not happy with the sound etc. started off by copying out the flange using the gasket (i think i need a new gasket anyway) thankfully i had an old petrol pump blanking plate that was perfect for bolt holes and nearly for shape! handy! picking some nice tube for the exhaust (same tube i used for the exhaust on my other tractor) mounted up ready to get drilled roughly to shape roughly drilled now and marked out for the filling (i need to get my self a die grinder or Dremel) pretty much done, just some smoothing to do. Not sure why i took this but here you go anyway marking out where to chop off the unnecessary part of the flange Looking good This will be clamped on. i did end up putting a few more slots in. With this, tiny tiny exhaust clamp. its just a tiny bit to big but it should work as its the smallest they had, and i got sealant as well. so it should be alright. Right, back onto the tractor itself! the set of clips arrived! looked like it had got lost in the post but its alright! got what i wanted. on the spindle, greased up etc etc Thats all for now. Thanks James Edited May 16, 2016 by Jparkes43 1 Share this post Link to post Share on other sites
Jparkes43 329 #131 Posted May 16, 2016 Almost forgot. Little finishing touches James Share this post Link to post Share on other sites
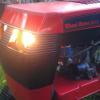
Jparkes43 329 #132 Posted May 18, 2016 Hello all. Well i think these photos and videos show it all. (note the sparks are hot carbon from the exhaust where it was used on a very old oil burning engine. since then it has cleared our from running and revving and now produces nicer blue jetted flame (will get some pictures of that soon. but these pictures are still pretty cool. the new exhaust does sound nicer as well with a nice tone, maybe a tad quieter. the next time i fired it up the flames got better more blue and not so orange and the sparks went. so result! skip to about 0:06 seconds ish James 1 Share this post Link to post Share on other sites
Jparkes43 329 #133 Posted May 20, 2016 Hello all heres some more fun. Well back to serious restoration talk i'm in trouble school was going to weld my cast iron steering bracket for me because it cracked and broke but they can no longer do it! so i've got to find somewhere else to get it done!! or get a new one. the problem is there isn't any point me painting anything else up because i need this piece to be done first and bolted up! so it's halting the whole process. James Share this post Link to post Share on other sites
Jparkes43 329 #134 Posted May 24, 2016 Hello. Been back at work with some more painting etc. First up i wanted to get some primer on the brake drum ready for paint as i now have some more. before any paint after a coat or two although sorry this picture is quite dark it still gives you an idea of how it looks. time to do the other side. Up next i decided i wanted to get the very high temperature black paint on the exhaust. so i set about cleaning it up. I do want to ask a question about the drum, the drum has one side where it is deeper than the other. does it mater what side goes where in terms of the placement on the gearbox?? this stuff coats quite light so it needed a lot of layers nearly done. and then after it had cured i bolted it on and fired it up to fully harden the paint looks really nice! I started but didn't finish getting some more bits cleaned up. Oh and i need your advice on this. my steering bracket broke way back when i took it off. its cast iron. can this be welded as i'm unsure with this material. thanks james Share this post Link to post Share on other sites
Jparkes43 329 #135 Posted May 26, 2016 Hello! Back here again with some more stuff for you all to take a look at. got paint on the brake drum. one side (gearbox facing side, is black) outside, is red. taking up some paint i think it works well as paint that your not going to see but its on for protection Red on the other side looks good! All put back on i have to say i am liking it then as i now have some more primer i decided to put some on other parts thanks James Share this post Link to post Share on other sites
Jparkes43 329 #136 Posted May 28, 2016 Hello. I mean its progress at least. but nothing much. thought i would share anyway. James Share this post Link to post Share on other sites
Jparkes43 329 #137 Posted May 30, 2016 Some more painting has happened! I did accidentally buy satin black but it looks good and it works well and to be honest its not far off from the flat black. The steering arms are looking good and ready to go on in a little while. Sorry it is quite hard to take a picture of these when they are hanging but you get the idea Next was the belt tensioner/clutch and that worked out very nice! James Share this post Link to post Share on other sites
Tuneup 1,416 #138 Posted May 30, 2016 It's frustrating to do it all a piece or two at a time (I am doing it the same way) but a great feeling when it starts to come together. Great work! Share this post Link to post Share on other sites
Jparkes43 329 #139 Posted May 30, 2016 Yes i know the feeling but i just haven't the time recently so thats why. oh it really is! and i cant wait to get on with it some more in a few weeks (end of exams) thanks anyway for the kind words But for now ill have to keep at it with small jobs. James Share this post Link to post Share on other sites
Jparkes43 329 #140 Posted June 7, 2016 Hello. Heres some more bits and pieces for you all. Back working on the gearbox etc also have another project in the works/planning. Have to wait and see what that is its not a horse buts its going to be awesome. Started this one off with the brake linkage etc Starting to look better. Some parts with paint on them Showing what i have painted for the moment The brake band also got some of the clean and black treatment. (the inside didn't as it is the side where the brake lining touches) Started some reassembly Thanks James Share this post Link to post Share on other sites
Jparkes43 329 #141 Posted June 8, 2016 Hello again Today i had a few spare minutes so i decided to get the rear wheels on as i now can. I have to say with no other bodywork etc on they look very big etc The colours look amazing together!! Then I did what i feared ill have to do, take the engine out again ahaha. To get the steering shaft in i have to take the engine out, so i drained the engine of fuel etc and un bolted it, laid it to rest back on the chassis though. now we can get it to a full rolling chassis James 1 Share this post Link to post Share on other sites
callum12 256 #142 Posted June 8, 2016 exciting times! I love the black wheels with red hubs, looks really smart! Callum Share this post Link to post Share on other sites
Jparkes43 329 #143 Posted June 9, 2016 (edited) Thanks Its very exciting! its a sign that things are coming along nicely Yes thats what i hoped and to be honest they turned out greater than i thought they would! Very happy James Edited June 9, 2016 by Jparkes43 Share this post Link to post Share on other sites
Jparkes43 329 #144 Posted June 13, 2016 (edited) Hello. got a nice few bits done over the past little while (just not been uploading etc) sorry More parts in primer (steering items this time) Got some primer given to me by work do i'm very grateful for that then got some painted Then it was time to start putting bits together and make it a proper rolling tractor once again in place putting the steering arms in Engine can now go back on finally ahaha Wheels now going on! And she is a roller! and looking goooood!! Then i decided to push her outside and see her in the light for the first time in ages! fired it up as well just to hear it ahah James Edited June 14, 2016 by Jparkes43 1 Share this post Link to post Share on other sites
russellmc301 600 #145 Posted June 13, 2016 looks good, keep it up 1 Share this post Link to post Share on other sites
Jparkes43 329 #146 Posted June 14, 2016 (edited) Thanks a lot!! I will do! Today is my last exam! woooo whooo, so that means i will have a lot more free time so this will be coming along nicely. update on the registering for the road, i now have another from to fill out that i'm going to do but its not the most exciting so i've been putting it off. James Edited June 14, 2016 by Jparkes43 Share this post Link to post Share on other sites
Jparkes43 329 #147 Posted June 15, 2016 Hello. So remember i said last exam means a lot more free time? aha, well today school gave me a load more work to do so that may not be so true oh well just to say it may be small updates again for a little while. Any way heres one picture. got the gear selector shaft cleanup and ready for primer/paint James 1 Share this post Link to post Share on other sites
Pullstart 59,548 #148 Posted June 15, 2016 The roller looks great James! 2 Share this post Link to post Share on other sites
Jparkes43 329 #149 Posted June 15, 2016 thanks a lot pullstart!! james 1 Share this post Link to post Share on other sites
callum12 256 #150 Posted June 15, 2016 rolling chassis!! Pullstart's right it really does look good! I love the black with the red. and wow you gearstick is so shiny it looks like new, mine is really, really pitted! Callum Share this post Link to post Share on other sites