Jump to content
tommyg

bearing plate frustration

Recommended Posts

tommyg

Ok, this is the second time this thing has broken, so now I'm a bit frustrated. The casting on the bearing plate on my D180 that supports the PTO arm just broke again. Last time the fix was another bearing plate. Now I'm wondering if this is something that will continue to happen and whether or not I need to figure something else out. Anyone else have this issue with their D series and Kohler engine? How did you remedy the problem? I can't just replace bearing plates every time this happens. Anyone have another laying around collecting dust? Does anyone know how this closure plate is removed? Last time I got part way and got stuck. Had to have someone at an engine repair place finish the job. Seems there is a snap ring hiding somewhere that's not very conspicuous. Model # on the engine is K4828.

Edited by tommyg

Share this post


Link to post
Share on other sites
 
bgh5469

I am currently replacing my closure plate on my D180 as well.  Once you take the pto clutch off,  there is a seal cap on the front center of the closure plate, pop that off and you will find the another snap ring that you need to remove before the closure plate will come off.  Try not to damage the seal when you remove it,  I found out the hard way that it is 20 bucks for a new one.  The seal is number 15 in the attached picture. 

Untitled.png

Share this post


Link to post
Share on other sites
 
"D"- Man

P.M. sent, Mark.

Share this post


Link to post
Share on other sites
 
tommyg

BGH5469, I see one snap ring, (12) but it's on the opposite side of the bearing. How would you get to it? Or is there another snap ring just behind the seal not shown in the picture? Or maybe I'm missing something.

Share this post


Link to post
Share on other sites
 
wheeledhorseman

I've suffered this issue with a D-200. From a design perspective, it's not the best to my mind in expecting the lug on the plate casting to support the PTO lever in the way it does. It's an issue that I think is made worse as parts wear e.g. where the pulley / clutch unit pivots on the arms resulting in the need for adjustment that effectively puts more strain on the hook thing that mounts on the bearing plate lug. Just my theory.

Anyway, the D-200 came to me with all the PTO bits in a sack having been removed at some point. The reason turned out to be that the lug was parting company from the plate. Putting all the bits back together I discovered the hook was missing and a PO had obviously attempted to make a little bracket to replace it which gave me an idea given that parts for these tractors are pretty much non-existent here in the UK.

D-35.thumb.jpg.1dd2611959c999182d35c787b
I fabbed a support / reinforcement bracket which was bolted to the main chassis rail. (Those little holes in the closure plate above my bracket are by the PO, a failed attempt I think to stop the fracture lines running any further)

D-36.thumb.jpg.c22adb42a1bd5446b345b2113

Once it was all painted in red it was hardly noticeable to the casual eye.

It's possible that you could use the original hook with this arrangement but I can't say as I didn't have one. Making the little right angle bracket to take its place was a pain as trying to get the geometry of the whole thing right took more than one attempt and something that I need to revisit when I have time as it could still be better. 

I offer this as a potential 'belt and braces' approach that worked for me. It certainly takes the strain off the bearing plate lug. 

Andy

Share this post


Link to post
Share on other sites
 
bgh5469

The snap ring that holds the plate on is just behind the seal(15)  it is not shown in that diagram.  The snap ring(12) is a monster like 3" in diameter and holds the bearing into plate.  Snap ring (12) does not have to come off till you get the plate off the tractor.

Andy your "belts and braces" idea is great!  I think i am going to add that to my tractor! 

Share this post


Link to post
Share on other sites
 
tommyg

The snap ring that holds the plate on is just behind the seal(15)  it is not shown in that diagram.  The snap ring(12) is a monster like 3" in diameter and holds the bearing into plate.  Snap ring (12) does not have to come off till you get the plate off the tractor.

Andy your "belts and braces" idea is great!  I think i am going to add that to my tractor! 

OK, that makes sense. In the meantime, Andy, I used some of the same ingenuity you did with a simpler arrangement. I can post some pics this evening, but what I ended up with was a small pieces of 1/4" steel about 3/4" wide and 1 1/2" long. Drilled a hole in each end. To attach it to the engine, I used the existing bolt hole right near the now missing casting lug that attaches the bearing plate to the engine block. Just replaced the bolt with one a little longer. On the other end, I drilled another hole that accommodated the OEM threaded "L" rod used as the pivot point on the PTO arm. The thing is bullet proof and will definitely outlast me! I'll take some pics tonight if anyone else has an issue with this all important lug! Thanks for posting your solution!

Oh, and can you throw a little oil and dirt on your tractor? You're making me look bad.

Share this post


Link to post
Share on other sites
 
wheeledhorseman

Glad you've come up with a solution - looking forward to seeing the pics. 
The photos I used were taken about three years ago when the resto was nearing completion - look carefully and you'll see that the new bolts used during reassembly hadn't been painted in yet. The tractor has gained the 'little oil and dirt' you mention since.

Nothing wrong with the rat look though.......this is my other D

D200_project2.thumb.jpg.e8307d2fee8f5005
 Another old photo - it looks a bit tattier now as PO had wiped it over with oil which I haven't kept up but I have put the correct rear lights on it since.


Share this post


Link to post
Share on other sites
 
tommyg

Andy, here's a pic of what I ended up with. Where the casting broke, it cleared the way for me to attach a piece of bar stock about an inch and a half long. Got a longer bolt to thread into the engine block to secure the bearing plate. Then I used the OEM threaded "L" round stock and welded a washer near the bend. I needed to place a couple spacer washers on next, then secured that with a self locking nut. Turned out pretty good. It really is bomb proof. Sad news was that the very next day, I was cutting the lawn and threw a rod. :-(

DSC_8474.thumb.jpg.50ba1327729607938a238

Edited by tommyg
  • Like 1

Share this post


Link to post
Share on other sites
 
wheeledhorseman

Neet work and solution  - I like it! It's what WH should have done in the first place.

Sorry about the rod - that's a ***** but part of life's rich tapestry of challenges with these aging beasts I guess.
My 'shiny' D-200 was laid up for a year till I fixed the dead hydro hopefully you'll get yours on the road again fairly quickly.

Andy

  • Like 1

Share this post


Link to post
Share on other sites
 

Create an account or sign in to comment

You need to be a member in order to leave a comment

Create an account

Sign up for a new account in our community. It's easy!

Register a new account

Sign in

Already have an account? Sign in here.

Sign In Now

  • Similar Content

    • Southern_Secret
      By Southern_Secret
      Hello fellow Horse Heads long time no post for me, life gets crazy & a lot of things change sometimes but anyhoo. So back a few years ago when I first got my 1994 314-H I had it at my shop going threw it. One of my customers walk past as im working and said, you know I think Iv got a Wheel Horse & im thinking "no you dont buddy". I give him my # to send pics thinking it was a big waste of time & after getting the pics I realized he did have a Wheel Horse! I hand shake bought it right there, asked him to bring it to my store & he said no problem. Well after almost 2 years it is finally in my orbit. I know very little about it other than his father-inlaw got it new and used it around his house moving snow and stuff. His father inlaw moved down south here when his daughter got married and gave the tractor to my customer because he had a farm & his the inlaw had no use for it anymore. Same with every barn find, "it was running when parked" 8 years ago, said one of the axel seal is leaking. Im happy and hope I can get it back in running order soon cause it is going to be handy around the truck farm!!
       
      I will post Pics as soon as I reinstate my membership
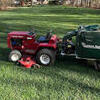


    • Swemill
      By Swemill
      Hi everyone!
      Long time since i was here and my old pics is gone from the forum.
      I just uploaded a movie with pics on youtube, and thought i could share it for you guys.
      I would love to get some comments on my Youtube channel, from you true Wheel Horse fans! 
       
      Thanks and Best Regards  
       
       
    • 87buickt
      By 87buickt
      Listing for a friend, late 70s I believe D200 deck and plow. Been sitting for a while, make reasonable offer, friend also has tons of literature he may part with, if Interested let me know

    • Nathan W
      By Nathan W
      Does this look factory for 1976 


    • wh315-8
      By wh315-8
      Anyone be able to measure out the Top Link Bar for the 50” D Series Tiller?
      Just finished rebuilding a tiller, have a adjustable type but would like to put a original type on like the manual has listed.


×
×
  • Create New...