Hodge71 662 #26 Posted January 18, 2014 (edited) This may help you as well Action horse. Paul and I have done a few of these already and documented Karl has it pinned to the top of the Instructional section in the forum Edited January 18, 2014 by hodge71 Share this post Link to post Share on other sites
Actonhorse 26 #27 Posted January 19, 2014 Wow, I am constantly amazed at the amount of help and information I get from this forum! Bear with me as I do this, I have never gotten into anything like this before and I am gonna take my time and do it right! Thanks Dave for the pics and description. THanks also Hodge, I just read your post and it makes a lot of sense now that I have mine open. I spent a lot of time today cleaning the work bench and getting ready so that I have the room to do the rebuild keeping everything in order and keeping it clean! I'll update as I go . 2 Share this post Link to post Share on other sites
stevasaurus 22,229 #28 Posted January 19, 2014 (edited) I agree...this thread should be in Red Squares Greatest posts. Thanks Dave... Edited January 19, 2014 by stevasaurus Share this post Link to post Share on other sites
Actonhorse 26 #29 Posted January 20, 2014 Update: I had some time Saturday and I managed to dig into the motor. I found much the same situation as the pump as Dave and others have suggested. Here are a few pics. Everything looks like it has some scarring so it will all get resurfaced but when I took a better look at the piston block and slippers I noticed that the slipper ring (not sure exactly what it is called but you get the idea) is out of shape with some bending: Is this normal? I don't think it is but I can't imagine how it would get bent like this. Also, the retainer and spirallock from the center of the piston block didn't come out as planned no matter how much I checked the manual so I am thinking I will have to replace them. I was all set to start resurfacing and cleaning on Sunday but we are having the "best" winter in southern ontario in about 10 years and the trails are mostly open around me so my son and I loaded up and spent the afternoon on these! 2 Share this post Link to post Share on other sites
can whlvr 991 #30 Posted January 21, 2014 cant say if the ring is supposed to be bent but I think I agree with you,probally shouldn't be,thats whet let go in my pump,heres a pic Share this post Link to post Share on other sites
Actonhorse 26 #31 Posted February 4, 2014 Update: With all of the snow and bone chilling cold I haven't been able to get to this pump and motor for a while. I finally had a chance last night and I made the best of it! I managed to get the pump completely cleaned out and resurfaced. Here are a few pics of the progress: swash plate ready to go Starting to resurface the slippers - can you tell which one is done?... This was easier than I thought it would be. It just took patience. It probably took an hour to do all nine and the swash plate. Here is how I made sure they went back in the same bore. I was using the glass as a flat base for polishing and a sharpie worked well on it. All done. The piston block was cleaned and each individual piston making sure tha the pin hole in each is open The paper and glass also worked really well for removing the old gasket and cleaning up the pump block. More to come! 1 Share this post Link to post Share on other sites
Theroundhousernr 589 #32 Posted February 4, 2014 Glad to see you moving along on your project. I was wondering how you where making out. Do you plan to have the Gerotor / charge housing milled a few thousands to clean it up? Also interested to see how she performs for you after its together. I see alot of posts on these rebuilds but knowone seems to say how they work afterwards. Kyle Share this post Link to post Share on other sites
can whlvr 991 #33 Posted February 5, 2014 ya interesting thread,since a lot of tractors seem to blow the pump sooner or later,so how did you make out with the ring,i think that part is still available from Sundstrand,thats why I got mine done at a shop,i went to a shop in Brampton to get the ring,the guy told me that if I wanted a unit that will work and last that all the parts you are conditioning needed to be done or don't bother spending any money on it,so keep us informed how it goes Share this post Link to post Share on other sites
Actonhorse 26 #34 Posted February 12, 2014 Glad to see you moving along on your project. I was wondering how you where making out. Do you plan to have the Gerotor / charge housing milled a few thousands to clean it up? Also interested to see how she performs for you after its together. I see alot of posts on these rebuilds but knowone seems to say how they work afterwards. Kyle Right now I have most of the parts cleaned up and ready to go, just waiting on a few more parts that should show up this week. I have a friend that is a machinist and he checked the gerotor and housing and cleaned them up. He didn't tell me how much he took off but said it only took a few minutes. I will definately up date my progress as I put it all back together and let you all know how it runs in the end. ya interesting thread,since a lot of tractors seem to blow the pump sooner or later,so how did you make out with the ring,i think that part is still available from Sundstrand,thats why I got mine done at a shop,i went to a shop in Brampton to get the ring,the guy told me that if I wanted a unit that will work and last that all the parts you are conditioning needed to be done or don't bother spending any money on it,so keep us informed how it goes Yeah Don, I am getting the same advice that if you want it to run right you have to clean everything and resurface all of the parts. That's what I'm doing! I ended up finding a ring from Daveoman and am currently waiting on the parts. I'm hoping to see them this weekend! With monday being the "family day" holiday I should have lots of time! Share this post Link to post Share on other sites
can whlvr 991 #35 Posted February 13, 2014 keep us informed dean,it would be nice to know of approx. cost when your done too,i can tell you when its done you wont be disappointed,every time I get on my c160 I just love it,and the ease of acess to the bell crank is a huge bonus Share this post Link to post Share on other sites
Theroundhousernr 589 #36 Posted February 19, 2014 How goes the hydro endeavor? Share this post Link to post Share on other sites
Actonhorse 26 #37 Posted February 19, 2014 Just a small update. I recieved the rest of my parts in the mail yesterday: I have the transcase cleaned out and ready, picked up new differential bolts (grade 8 with nylox nuts), installed new axle bearings and seals and tonight I'm gonna work on getting it all together! It has been a nutty winter. Here is what things look like now. It seams every time I get ready to go I have to clear the snow first. I have more seat time on the C100 and B60 than I have in the last 5 years! Oh well, seat time in the winter is always good too. Tthe forecast is calling for 1" of rain tomorrow so things might look different and I might have to spend some time clearing the snow tonight so my garage doesn't flood. There is a big pile of brush on the right side of the driveway from the ice storm we had over Christmas and there is a pile of logs from work as well that will have to be moved before it rains so the water will run into the field beside me and not through the garage! 1 Share this post Link to post Share on other sites
Lane Ranger 10,472 #38 Posted February 19, 2014 I really appreciated viewing this entire thread and the work you are doing Actonhorse! This is also going to help other Red Square Wheel Horse members! 1 Share this post Link to post Share on other sites
Whmaverick 54 #39 Posted February 20, 2014 This was such a good post I decided to pull the trigger and tear into my favorite go-to worker, the trusty C-160 auto. I was wondering though, where you got the gaskets in the last pic? I put mine together last night and tried it out, well, some ones advice was to make our own gaskets and not to seal them. Ok, that was a mistake as the pump housing and motor cover both spewed oil all over soon after it built pressure. So the question is where to get gaskets, and to seal or not to seal? Share this post Link to post Share on other sites
Actonhorse 26 #40 Posted February 20, 2014 This was such a good post I decided to pull the trigger and tear into my favorite go-to worker, the trusty C-160 auto. I was wondering though, where you got the gaskets in the last pic? I put mine together last night and tried it out, well, some ones advice was to make our own gaskets and not to seal them. Ok, that was a mistake as the pump housing and motor cover both spewed oil all over soon after it built pressure. So the question is where to get gaskets, and to seal or not to seal? The gaskets were a tough one. I couldn't find them locally and I ended up getting them from Daveoman. I actually got a bunch of parts from Dave. Good guy and helped me out a lot. I haven't sealed my gaskets but I just got it together last night and haven't tried it yet so I will let you know if it leaks or not. Share this post Link to post Share on other sites
Actonhorse 26 #41 Posted February 20, 2014 Update! and progress! Warmed up the garage last night and spent some quality time putting things back together. First order of business was removing the damaged parking pawl. I tried soaking it, tried heading it, even tried to gently tap it out. No luck. I ended up centre punching it and drilling it out of the bracket. For me this went really well. The drill bit managed to go straight and left a little material that came free. Here it is out and you can see how far I had to go to drill it New one installed Next was to install the replacement axle that started this whole repair. Here it is installed. If any one has wondered why it is not recommended to hammer on the wheel hubs to remove them from the shaft this is why - the C clip is all that holds it into the differential. I cleaned and installed all of the gears and the differential. Also installed new grade 8 bolts with nylox nuts in the diff case. New gasket and it is back together Next I went on to the pump. I already had most of this ready to go and was just waiting on the gasket. It went together smooth with the help of the manual. If you look close you can see that I had to get out my "green" 12 point socket for this one. And on to the motor. I hadn't resurfaced the valve plate yet so that is where I started on this one. The rest of it was ready to go so after resurfacing the plate it was assembly time! Again, if you are working on one of these, the manual is extremely important. There are a bunch of little things that have to be done right and oriented properly for these units to function properly. The installation went well. I didn't get a chance to take a lot of pictures of this one going together as I actually forgot! I was having too much fun I guess. The thing to remember when putting the housing on is to have the "webbed" section oriented up or the pump will run opposite of what you want. Here is a pic of the motor together. And from the output side And the pump and the motor back together again And here is where I ended the night. Transaxle, pump and motor assembled, ready to go on the workbench. So, If I'm not on flood duty tonight I hope to clean the hydraulic valve, cylinder and lines on the tractor and start getting things back together for a test run! 1 Share this post Link to post Share on other sites
Theroundhousernr 589 #42 Posted February 20, 2014 This is great. Thanks for the update. Both of my horses are hydro's. One is a piston to piston and the other piston to gear drive. Can't wait to hear the final results. Share this post Link to post Share on other sites
Whmaverick 54 #43 Posted February 21, 2014 Thanks action horse for the great pics, and tips, I can't wait to see how it all works out for you. I have another hydro to do next, just need to work out some sourceing of gaskets and such. Keep the excellent documentation comming. Share this post Link to post Share on other sites
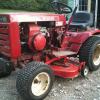
Actonhorse 26 #44 Posted February 21, 2014 First of all, since most of you are in the US. I just want to wish you all condolences on your olympic gold medal hopes for men's hockey I don't know why the best hockey players come from Canada... maybe its the 8 or 9 months of winter! Go Canada Go! That being said, we will take Kessel and Vanreimsdyk back after the tournament to play for the Leafs. Okay, back to the C160. Last night I managed to have a fairly good night and everything worked well. First cleaned out the lift cylinder and all of the hyd lines THe rest is kind of a blurr. My youngest son - 15 years old came out to help me get the transaxle mounted and the hydrostat mounted back on that. Everything went back together really smooth and we were working so well together that I entirely forgot to take step by step pictures. The only other one I have is this one: and the other side: This is back on all 4! It performed amazingly! No leaks, Lots of power and speed in forward and reverse and no strange noises! We did get the weather that they were predicting last night including a Thunder snow storm so I didn't get a chance to run it hard for any length of time so that will be the job for this weekend. I plan to put a plow on it and give it a work out either tomorrow or Sunday and I will let you all know how it goes when it warms up. I'll also try to post a video of it working when I get there. So, thanks to everyone who contributed to this post and gave me advice along the way, This was probably the most complicated project I have ever done and I am very gratefull for all of the help. Oh and by the way, this is my first auto tractor and I like it! 5 Share this post Link to post Share on other sites
can whlvr 991 #45 Posted February 23, 2014 nice job dean,thats a nice lookin 160,its nice to know that the pump is good to go for years to come,and I must say I most like driving the 160,not that all of them arnt great,but the big single on the auto is a nice combo Share this post Link to post Share on other sites
jsbostic 0 #46 Posted May 7, 2014 Does anyone have a strainer p/n 106047 or know where to order one. It's the transmission stainer for a C-121. Sundstrand unit 90-1172. Thanks Does anyone have a strainer p/n 106047 or know where to order one. It's the transmission stainer for a C-121. Sundstrand unit 90-1172. Thanks Share this post Link to post Share on other sites
pfrederi 17,129 #47 Posted May 7, 2014 What is wrong with yours? Kelley or another vendor on here may have a good take out Share this post Link to post Share on other sites