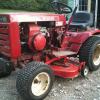
Actonhorse 26 #1 Posted January 12, 2014 Okay, I picked up a 74 C160 yesterday and it wouldn't move forward or reverse. The PO told me that he was using the snow blower and it got really slow and then just quit moving all together. When I got there to pick it up I was expecting to have a hard time rolling it on to the trailer but he told me no problem, it rolls fine... This is my first hydro tractor so I wasn't entirely sure what that meant but I assumed he had opened the tow valve to get it back to his garage. Anyways, I got it home and started it up (this is the first 16 I have had and it is awesome! ) and tried a few things but no movement. Then I checked the tow valve and it is closed... All of a sudden it hit me and I asked my boys to watch the axles while I tried forward an reverse and sure enough, the right side axle is spinning inside the hub. This is when I am hoping that it is a simple brokey woodruf key! Well, we got the hub off and yup the key is destroyed and so is the end of the axle! It has a deep groove all around where the set screw rode around the axle. It appears that they just kept tightening the set screw to get it to move and it is beat up good. Here is my question. I have an eaton 1100 transaxle out of a 417-a that has the same diameter axles but does anyone know if they are even close to the same? If not, I will be looking for a new axle. Here are a couple of pics of the tractor. Share this post Link to post Share on other sites
stevasaurus 22,229 #2 Posted January 12, 2014 It's possible. Since you have to tear down the C-160 anyway, you can take the axle out and measure it. The Eaton 1100 trans manual says that the right hand side axle is 13 1/8" long...if that is what you find in your C-160, it just may swap out. If not...send a PM to racinfool40 (Mike)...he probably has the replacement axle for you. Share this post Link to post Share on other sites
squonk 38,848 #3 Posted January 12, 2014 (edited) If you feel like driving 200 mi, I have a complete Sunstrand Hydro trans out of a 74 C 160 I will sell cheap! Edited January 12, 2014 by squonk Share this post Link to post Share on other sites
Actonhorse 26 #4 Posted January 13, 2014 I managed to get it torn down today and here is what the axle looks like: and I did measure it Steve, thanks for the info but I don't think it will fit: The metal strainer at the bottom of the case seemed to do its job and I found this attached to the magnet. Can anyone tell me where it might have come from? Could it have come from the parking pawl? It is fairly worn. Should it be replaced? The rest of the transaxle looks okay but I am going to replace the axle bearings and seals - might as well while I am in there and the one side didn't come out too clean and the needle bearing is damaged so I don't have a choice... One more question: Is this the correct filter? If you feel like driving 200 mi, I have a complete Sunstrand Hydro trans out of a 74 C 160 I will sell cheap! Thanks Squonk, I might have to take you up on that offer but I am really hoping to find one local or one of the venders can ship one to me. Share this post Link to post Share on other sites
daveoman1966 3,586 #5 Posted January 13, 2014 (1) The tiny debris magnet you found loose should be BONDED to the inside end of the filter screen (damaged as shown). (2) Yes...the filings on that magnet are from the destroyed parking pawl. You will find the rest of the parking pawl scattered thru the system or trapped by the oil flter. (3) I am send you a PM describing the replacement parts I have for this C-160 Auto. To contact me directly via email, I am : daveoman@windstream.net 1 Share this post Link to post Share on other sites
squonk 38,848 #6 Posted January 13, 2014 That filter is incorrect. That is an engine oil filter for Dodge. If you have a Napa near by get a # 1410 Share this post Link to post Share on other sites
stevasaurus 22,229 #7 Posted January 13, 2014 BTW...thanks for sharing all those excellent pictures. Looks like you are in good hands. Share this post Link to post Share on other sites
Actonhorse 26 #8 Posted January 13, 2014 BTW...thanks for sharing all those excellent pictures. Looks like you are in good hands. No Problem Steve. I always find it helpful to follow the threads with pictures so I will keep updating them as I get more into this repair. I'm working on parts for now. 1 Share this post Link to post Share on other sites
stevasaurus 22,229 #9 Posted January 13, 2014 (edited) You got that right...you post pictures and the members can see what you have and they will respond. No pictures and we get a little shy. Your pictures are great...makes it easy for us to help. You knew that. Edited January 13, 2014 by stevasaurus 1 Share this post Link to post Share on other sites
Actonhorse 26 #10 Posted January 16, 2014 I decided to have a look in the hydrostatic unit tonight to see what kind of condition it is in due to the parking pawl being so torn up from panic stops. I figured once I know the condition of the hydrostat I could decide whether or not to put the money into the transaxle to fix it. Here is what I found: On the work bench: Split the motor and pump. No signs of any metal fragments yet. O rings look good too. Then I manages to split the valve block from the pump housing. The valve block? came out nice and clean with no signs of gouging or wear from metal fragments and looks good to me The swash Plate (I think that is what it is called) is clean and smooth with no grooves. The manual says to run your fingernail over it to check for wear and there is none! The valve block and gearator look really good as well. Hardly any signs of wear. So i cleaned out the pump housing and still no signs of any metal fragments or wear so I am thinking that somewhere along its life it has already been either cleaned really well or rebuilt and whoever rebuilt it just decided to leave the parking pawl and rebuild it the way it is. Either that or the filter and strainer did catch the metal that went through and it did minimal damage. Either way, I am really excited that I didn't find all kinds of damage in this one! Now to start gathering parts and get it back together. Please let me know if you guys see anything that I am missing or if there are any other areas that I should be checking... 1 Share this post Link to post Share on other sites
stevasaurus 22,229 #11 Posted January 16, 2014 You are way past my expertise...this is where I start watching and learning...those are great pictures. I hope the guys that know what you have there chime in. 1 Share this post Link to post Share on other sites
pfrederi 17,129 #12 Posted January 16, 2014 There are several threads on sundstrand overhauls. Your does look pretty good. Since you are this far in there seem to be some scratches on the slippers (the piston like things). I would take them out one at a time (they need to go back in the same hole) and dress them on some very fine wet/dry paper and/or crocus cloth on a piece of glass (for flatness). Also pull the acceleration valves and clean them and make sure the tiny (and i mean tiny) bypass hole is clear and the springs are not broken. She looks good. 1 Share this post Link to post Share on other sites
Actonhorse 26 #13 Posted January 16, 2014 You are way past my expertise...this is where I start watching and learning...those are great pictures. I hope the guys that know what you have there chime in. haha, its way past my expertise as well! I've read through several other threads, i've got the manual and figured why not...we'll see how it works out! There are several threads on sundstrand overhauls. Your does look pretty good. Since you are this far in there seem to be some scratches on the slippers (the piston like things). I would take them out one at a time (they need to go back in the same hole) and dress them on some very fine wet/dry paper and/or crocus cloth on a piece of glass (for flatness). Also pull the acceleration valves and clean them and make sure the tiny (and i mean tiny) bypass hole is clear and the springs are not broken. She looks good. Thanks for the heads up Paul. I will pull the acceleration valves tonight and clean the slippers and let you know what I find. 1 Share this post Link to post Share on other sites
Actonhorse 26 #14 Posted January 16, 2014 By the way, I have been searching but can't seem to find a part number for this gasket. Do any of you know what it is? Share this post Link to post Share on other sites
Actonhorse 26 #15 Posted January 16, 2014 Okay, I found the part # for the gasket: the old number was 200223, new number is 83-3850. Bad news is it is NLA from Toro. Anyone have any ideas where to find one? Share this post Link to post Share on other sites
pfrederi 17,129 #16 Posted January 16, 2014 Sorry no source. Made mine with gasket material and a scalpel... Share this post Link to post Share on other sites
coldone 35 #17 Posted January 16, 2014 LJ Fluid power 10118 S M 43 Hwy, Delton, MI 49046 (269) 623-4150 ask to speak with LJ and have your part numbers handy Share this post Link to post Share on other sites
can whlvr 991 #18 Posted January 17, 2014 when I did my 160 pump the hydro guy I used gave me some gasket and I made mine too Share this post Link to post Share on other sites
daveoman1966 3,586 #19 Posted January 17, 2014 (edited) STOP. You must refinish the brass slipper surfaces of the pistons (9 of them) and the swash plate also needs resurfaced. The gerator set is also worn to where it requires precision flat grind. If you remove stock from the face of the gerator, an equal amount must be precision ground from the face of the end cap to maintain tolerance. That gerator set is scarred and will not hold HOT oil pressure, ...the piston slippers won't either. Now that you've opened up the pump, also open the motor as it has nearly identical surfaces and will, no doubt, be scarred just like the pump parts. Here is what the brass slippers and swash plate should look like. I used crocus cloth as final surface grit, but you don't want a mirror surface either. These are parts from the hyd MOTOR and are very like the PUMP components. You need to precision flat-grind the thrust plate in each too. Ideally, the surfaces will be smooth and without noticeable scars or scratches of any sort. The scarring I see in the pics you posted are way way way beyond acceptable. Take the time and refinish NOW.... it'll be worth it, especially when you see the end results. Edited January 17, 2014 by daveoman1966 1 Share this post Link to post Share on other sites
daveoman1966 3,586 #20 Posted January 17, 2014 On sencond look, I can EASILY see the swirls and scarrs in the swash plate you've shown. These MUST be polished out COMPLETELY. If you have one scar that runs full around the swash plate, HOT High-Pressure oil will escape and power won't be maintained. Don't forget, yuou need to open up the hyd MOTOR too, and prepare yourself for the same news. The thrust plates are hi-grade steel and have to be precision ground. Brass surfaces can be 'wax -on....wax-off" using 400 600 and finally crocus cloth.....part by part, on a surface plate, using oil as a medium. 1 Share this post Link to post Share on other sites
daveoman1966 3,586 #21 Posted January 17, 2014 I just want to reiterate.... the hyd MOTOR must also be opened up and restored. To restore only the PUMP is defeating the whole purpose as the pump is only 1/2 the system. Don't forget to COMPLETELY FLUSH the gearbox and hyd lines, then install NEW oem filter. With just a little effort, gaskets can be cut out of stock from NAPA. Try to save a chunk or two of the old gasket to buy same thickness stuff. 1 Share this post Link to post Share on other sites
Actonhorse 26 #22 Posted January 17, 2014 Well, I guess I know what I am doing this weekend! Good thing for heat in the garage! Thanks for the advice Dave. I am going to pick up the things I need for resurfacing and see how it goes. 1 Share this post Link to post Share on other sites
can whlvr 991 #23 Posted January 18, 2014 when I did my c160 pump I opened up the pump like you did and found the slipper ring was destroyed,i searched for parts and found a shop that got me some,and had others made at a machine shop,he told me the same thing dave is saying,and remember to work absolutely clean,his shop was like an operating room,it cost me a fair amount,i think 400 rings a bell,i paid him cash and when I went to pick it up he said I got a really good deal,it should have been more than double that 1 Share this post Link to post Share on other sites
daveoman1966 3,586 #24 Posted January 18, 2014 220 400 600 grit emory and crocus cloth. Carb cleaner with spray nozzle. Air blast hose source. Kerosene as solvent / clean agent. PISTON & SLIPPERS: One by one, remove each piston from cyl block and progressively reface "wax on...wax off" the brass slipper until scars and scratches are GONE. A magnetic base stand-alone magnifying glass is a bonus to inspect finished surface. When done polishing one, spray carb cleaner to clear the tiny pin-hole in center of slipper. Set it back into the same cylinder and proceed to the next piston, full circle of the cyl block. Take care...be meticulous and don't rush. Also take care to NOT round the edges of the brass slippers (no radius on edges). As you work with each of 9 pistons, inspect the sidewalls of each. Some scuffing may be present but there should not be any chips or dents at all. The slipper retainer can't be twisted or any of the 9 holes slopped out. VALVE PLATE (swash palte). Using a circular motion, scuff the bass side it of first on 600 grit, just to show where the scratch and gouges are. With any luck, they will polish out using the 600 grit, but I've had some that took the 220 grit to start, the progress to crocus cloth. The base of the clyinder block spins on the brass side of this plate so it is IMPORTANT to make it perfectly smooth, or it will again gouge the valve plate. THRUST PLATE (sits atop the brass slippers). This is hardened steel and requires precision grinder to resurface. It likely has near micro-scopic scratches, which is enough for HOT oil to bypass. The 9 slippers spin on this so it must be perfectly flat for the same reason as the valve plate. GEROTOR assy: Both sides of it have to be smooth, and each of 2 parts the same thickness. This sits in a round cavity on the back of the Charge Pump housing and the cavity is only slightly deeper than the gerotor is thick. So, if you grind a tenth off of the gerotor assy parts, then you must also grind a tenth from the back of the Charge Pump housing to maintain tolerance. PUMP END CAP: Lay it flat on surface plate and slide back/forth on emory paper to remove all signs of former life. Remove (save) all the O-rings and backup rings, then resurface the top of it in the same. The gerotor MAY have gouged this and all signs of the scars have to be removed. That's about the extent of refinishing surfaces, now do it again with the HYDRO MOTOR. It has nearly identical parts and the surface refacing is about the same. Use the kerosene to flush parts clean as you are working with them and set components aside in a plastic bag to keep clean. These Sundstrand Hydro units a highly susecptable to dirt of any kind so it is of UTMOST IMPORTANCE to keep your work area clean, and to flush clean every part / assembly as it is reworked. When reassembling the pump and motor unit, have at-hand a little bottle of RED Engine Assembly Oil. Put a drop or two of this RED oil on mating surfaces just so they are not bone dry when the whole thing is given the initial test run. Also note the location of the pin in the Charge Pump Housing. It must be oriented down...toward the motor. It can be mounted 180 deg out of phase, then nothing will work. Enjoy Here are a few pics that MAY be of assist: 4 Share this post Link to post Share on other sites
varosd 1,185 #25 Posted January 18, 2014 Dave's excellent photos should be "pinned" for future query's! Share this post Link to post Share on other sites