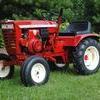
Horse Play 393 #1 Posted October 9, 2012 A few months ago I rescued my buddy's WH for $200 that had been sitting in a barn for a few years. It has a newer HM80 that seems to run great. So this winter I'm doing a restore; so far I derusted the front wheels and added some try-ribs. Last week I sprayed the black engine pieces with some Valspar IH red. 5 Share this post Link to post Share on other sites
AMC RULES 36,945 #2 Posted October 9, 2012 That seat is worth the price of the whole tractor. Nice save. Share this post Link to post Share on other sites
Jake Kuhn 1,547 #3 Posted October 9, 2012 Thats looking great. Take care of the seat, they bring very good money! ~Jake Share this post Link to post Share on other sites
KC9KAS 4,741 #4 Posted October 10, 2012 Looking good....And the Honda (CB350?) Share this post Link to post Share on other sites
Horse Play 393 #5 Posted October 10, 2012 I didn't know the seat would be such a big deal. It is in great shape except the top back corners are torn a little - not very noticeable. I was planning to put on a new seat so I didn't hurt the original because I'm going to use the tractor regularly mow. Share this post Link to post Share on other sites
Horse Play 393 #6 Posted October 10, 2012 Looking good....And the Honda (CB350?) It's a '71 CB450. My grandfather bought it new and it is all in pristine condition. All original minus tires and battery. He gave it to me this summer and I'll never part with it. 1 Share this post Link to post Share on other sites
KC9KAS 4,741 #7 Posted October 14, 2012 Looking good....And the Honda (CB350?) It's a '71 CB450. My grandfather bought it new and it is all in pristine condition. All original minus tires and battery. He gave it to me this summer and I'll never part with it. Very nice....Keep it maintained, and it will last forever...Honda & Wheel Horse alike! 1 Share this post Link to post Share on other sites
kfdwheel 8 #8 Posted October 22, 2012 Hey guys gonna get started finally on my 700 restore, was wondering of a 10hp techumseh is too much for this tractor, used to have an 8hp in it which was nice, i have a 5hp brigs from a snow blower in now, which isn't enough, but its about dead. Hope to rebuild it and use on a leaf sucking wagon. 1 Share this post Link to post Share on other sites
VinsRJ 721 #9 Posted October 22, 2012 Looks like a nice foundation for a resto! I miss my 1978 CB550K, wish I nver sold it. Share this post Link to post Share on other sites
KC9KAS 4,741 #10 Posted October 23, 2012 I miss my 1978 CB550K, wish I nver sold it. I feel the same about my 1967 CA77.....Honda 305 Dream Share this post Link to post Share on other sites
Horse Play 393 #11 Posted November 4, 2012 Here's a pic of the bike... Share this post Link to post Share on other sites
Horse Play 393 #12 Posted November 4, 2012 So I made some progress this week on tear down. My main priority in the next weeks is to have the "body panels" sanded, primed, and painted. I started with a DA and 80 grit on the hood. I want to the tractor to look good, but I am going to use it to mow my small yard, so here is some questions - What is the minimum I can tear down the chassis to get a good looking paint job for a tractor I'm going to use? How should I go about prepping the chassis for paint? My thoughts were to feather-out the spots with chips or missing paint, prime and wet sand primer, and then scuff the good existing paint. Will rear ag tires chew up my yard while turning when mowing? Bring out the dents!!! Is this the original WH hitch pin? Here's the seat in so-so condition. Share this post Link to post Share on other sites
KC9KAS 4,741 #13 Posted November 4, 2012 I think if you remove the wheels, tape the black sterring wheel, lift handle and shift knob, you have it tore down enough to get a good paint job. Just be sure to de-grease everthing well, and a high-pressure wash will help clean it up. Maybe a little sanding to rough-up the old paint so new paint sticks to it. :twocents-mytwocents: Share this post Link to post Share on other sites
Horse Play 393 #14 Posted December 6, 2012 I've been making a little progress. Now that I work swing shift it's hard to find the time. - I sanded the hood and fenders down to bare metal. Dropped the hood off to my body shop buddy for a little metal work. - Ordered decals from Redo Your Horse, including dash and deck decals. - Also have been working on the Tecumseh - cleaning off dirt/oil, carb rebuild, improving oil drain, new fuel filter and hoses, installed vintage "ballon" decal. So I could use some advice for sandblasting and priming. I sanded the top surfaces just fine with a DA and 80 grit, but the bottom of the fenders are hard to access with a DA. Is sandblasting a good option here? Also, I'm going to use etching or epoxy primer. Do most paint on top of etching/epoxy or use a regular primer, sand smooth with 600, and then paint? Share this post Link to post Share on other sites
JimmyJam 516 #15 Posted December 9, 2012 Looks like you have a good start on the restoration! Not to ask stupid question, but what is DA? 1 Share this post Link to post Share on other sites
AMC RULES 36,945 #16 Posted December 9, 2012 (edited) Dual action sander. Edited December 9, 2012 by TWENTYHORSETWIN Share this post Link to post Share on other sites
Horse Play 393 #17 Posted January 30, 2013 I've been hopping from one project to the other. Well the hood is in paint and looks good except the top broke out in some light fish eyes. Going to sand and buff then go from there; may have to block it an re-shoot it. Fenders are getting a little straightening and some glaze. My goal is to get the hood, fenders, and belt guard done for spring time. For this summer I'll use the the half-restored tractor for mowing. Next winter I'll do the frame stuff. Received my decals and they look great. Had a local sign shop do the dash decal, he even did it in one piece - looks great. For the tractors that came without the cigar lighter, what took the place of the empty hole? Share this post Link to post Share on other sites
VinsRJ 721 #18 Posted January 30, 2013 Looks like things are moving along... that drives me nuts... after all the prep work... darn fish eye... Share this post Link to post Share on other sites
Horse Play 393 #19 Posted January 30, 2013 I'm thinking it must have been something at the shop where I sprayed it because I used dewax and degreaser a few times like I always do before painting. It's sat for four weeks now so I should be able to start sanding on it. Share this post Link to post Share on other sites
TT-(Moderator) 1,127 #20 Posted January 30, 2013 For the tractors that came without the cigar lighter, what took the place of the empty hole? They had a chrome snap-in plug like these: LINK Share this post Link to post Share on other sites
Horse Play 393 #21 Posted January 30, 2013 Thanks, Terry. Something tells me I've seen those at the local hardware, I'll have to see if I can find the right size. BTW, I just saw where your from - I grew up just down the valley. Share this post Link to post Share on other sites
TT-(Moderator) 1,127 #22 Posted January 30, 2013 Those plugs are used in electrical boxes and also in sinks to block off the hand sprayer hole, etc. I've seen them in various stores, but I'm not sure about the size needed for the lighter hole. Small world, eh? :D Share this post Link to post Share on other sites
Horse Play 393 #23 Posted February 8, 2013 Those plugs are used in electrical boxes and also in sinks to block off the hand sprayer hole, etc. I've seen them in various stores, but I'm not sure about the size needed for the lighter hole. Small world, eh? Ha ha, I guess so. I grew up down in Howard and later moved to State College. Share this post Link to post Share on other sites
Horse Play 393 #24 Posted February 9, 2013 This is probably the slowest progress thread you guys have ever seen! I'm pretty happy with the dash. I found a plug and also picked up some SS screws. Now I just need to get some choke and throttle cables - I think I'm going to try the Toro ones. Is this steering wheel decal original? The one I received in my decal kit is different. We has a 55 degree day yesterday and luckily I had a day off. I power washed off the grease and dirt then washed it all with Dawn. I sanded down the fish eyes on the hood and my buddy re-shot it again for me along with spraying the belt guard too. He just called and said everything turned out great. Next week I'll have another buddy that does auto decals and pinstripes do my hood decals. Now my attention will be directed towards the rear fenders and getting the Techie ready and all new belts. 1 Share this post Link to post Share on other sites
Wishin4a416 2,185 #25 Posted February 9, 2013 Lookin good horse Play. That dash sure do look purdy! Coming along nicely. Share this post Link to post Share on other sites