WHX?? 46,772 #51 Posted January 10, 2016 As i tell my customers the only dumb question is one you don't ask....thanks Glenn .... just threw another buck into your cab fund....and two into mine..... 1 Share this post Link to post Share on other sites
WNYPCRepair 1,875 #52 Posted January 10, 2016 31 minutes ago, JERSEYHAWG / Glenn said: Jim, your not dumb, you just dont know. We all learn here. Glenn Really. I know almost nothing. I would be up the creek without the advice I get here. 1 Share this post Link to post Share on other sites
WHX?? 46,772 #53 Posted January 10, 2016 I wouldn't say up the creek Brian... but saving us a ton of money not to mention time and most importantly doing it right!! 2 Share this post Link to post Share on other sites
WNYPCRepair 1,875 #54 Posted January 10, 2016 On December 18, 2015 at 3:47 PM, gwest_ca said: If you look at one side of the locking collar you will see the counter bore is not round. The inner race of the bearing is extended and has the same out of round shape. When you put the two together they will not rotate within each other. This is the feature that locks the bearing inner race to the shaft so it does not rotate on the shaft under use. Stick a round punch up against the side of the hole in the collar and tap it tight in the direction the shaft is going to rotate and tighten the set screw. The two out of round parts are jammed together. The shaft and bearing are a good place to apply Never-seize. Garry OK, so I have determined the PTO on the 522xi turns clockwise. With the way the pluuey box is set up on the 2 stage blower, it appears the blower pulley would turn CCW. Can anyone confirm? Share this post Link to post Share on other sites
shallowwatersailor 3,213 #55 Posted January 10, 2016 If it is like the single-stage drive, it will be opposite the PTO. When you determined the PTO direction, were you looking over the hood in the driver seat, or in front of the tractor? 1 Share this post Link to post Share on other sites
WNYPCRepair 1,875 #56 Posted January 10, 2016 (edited) 1 hour ago, shallowwatersailor said: If it is like the single-stage drive, it will be opposite the PTO. When you determined the PTO direction, were you looking over the hood in the driver seat, or in front of the tractor? Over the hood from drivers seat. The PTO turns CW, which pulls the belt upward on the left side, which should pull it down on the left side of the blower pulley, from my reasoning. Hopefully it is correct, because I just finished. I would hate to have to tear it back down. Though I admit, it was easier to put together than take apart, since the bearings were locked on by the broken collar pieces. I also could not turn the locking collars on the bearings 90 degrees, I got about 50 to 60 degrees and it started turning the shaft, with the PTO and chain connected, which takes a bit of force, so I think they are tight enough. I was afraid I would break them, like the PO. Edited January 10, 2016 by WNYPCRepair Share this post Link to post Share on other sites
WNYPCRepair 1,875 #57 Posted January 10, 2016 (edited) After it is all back together, I notice the chain and the belt are at a slight angle, as if the sprocket and pulley both have to be closer to the bearings, but they are almost touching now. The parts diagram show the flanges for the set screws facing the bearings, but it was almost impossible to get the set screws tight with them that way. I am pretty sure they were facing away from the bearings before, but I am not positive, and not that confident the PO had done it correctly anyway, so I followed the parts diagram, but I think I need to flip them to get the belt and chain to line up properly, and to be able to tighten the set screws. Does anyone else have a 2 stage for an XI that can verify which direction they go? Oh, and now that I am done, I notice the diagram shows the direction of rotation, so I was correct. Looking closer at the diagram, they show the bolts on the tractor side of the pulley, so I will have to reverse it. The only way I can tell is the line from the set screw seems to go behind the pulley in the diagram. Hopefully, someone can confirm. Edited January 10, 2016 by WNYPCRepair Share this post Link to post Share on other sites
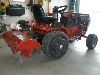
WNYPCRepair 1,875 #58 Posted January 10, 2016 Looks like I finished just in time too, it just started snowing Share this post Link to post Share on other sites
shallowwatersailor 3,213 #59 Posted January 10, 2016 Brian, I think that you have the flanges on wrong. All four should be inside the frame assembly. The flanges sandwich the bearings and then the pairs are bolted in place. That way the pulley and sprocket can be in-line. I had the same problem with my single stage being assembled wrong by the PO. They were on either side of the frame and allowed the bearing to wallow inside of them. 1 Share this post Link to post Share on other sites
WNYPCRepair 1,875 #60 Posted January 11, 2016 2 hours ago, shallowwatersailor said: Brian, I think that you have the flanges on wrong. All four should be inside the frame assembly. The flanges sandwich the bearings and then the pairs are bolted in place. That way the pulley and sprocket can be in-line. I had the same problem with my single stage being assembled wrong by the PO. They were on either side of the frame and allowed the bearing to wallow inside of them. Thanks. I should have figured he had that wrong too. Looks like I get to tear ir apart again tomorrow. If I can find time. I am still wondering about the flange with the set screws on the sprocket. I am sure he had them reversed, I'm just not sure which is correct. If you do it like the parts diagram, it is next to impossible to tighten the set screws Share this post Link to post Share on other sites
shallowwatersailor 3,213 #61 Posted January 11, 2016 I think I understand what you are saying. If the flanges are inside, you should pickup the width of the housing in extra clearance. 1 Share this post Link to post Share on other sites
WNYPCRepair 1,875 #62 Posted January 11, 2016 25 minutes ago, shallowwatersailor said: I think I understand what you are saying. If the flanges are inside, you should pickup the width of the housing in extra clearance. It may very well, the bump on the flange won't let the wrench turn far enough to get another grab with the wrench. Once it is on the other side, I should be good. Share this post Link to post Share on other sites
WNYPCRepair 1,875 #63 Posted January 11, 2016 21 hours ago, shallowwatersailor said: Brian, I think that you have the flanges on wrong. All four should be inside the frame assembly. The flanges sandwich the bearings and then the pairs are bolted in place. That way the pulley and sprocket can be in-line. I had the same problem with my single stage being assembled wrong by the PO. They were on either side of the frame and allowed the bearing to wallow inside of them. All better now. Thanks john. Tragedy averted. And the belt and chain line up now Share this post Link to post Share on other sites
shallowwatersailor 3,213 #64 Posted January 11, 2016 (edited) 1 hour ago, WNYPCRepair said: All better now. Thanks john. Tragedy averted. And the belt and chain line up now Too much money, time, and aggravation on your part to have it mess up again. When you mentioned about the pulley and sprocket not lining up, I looked at your photo closely and compared it to the parts blowup drawing. That is where I noticed that the flanges needed to be inside. That along with my prior experience with my single stage flanges - and a PO! I was hoping that someone with a two-stage 79366 would pipe in to confirm that. And thankfully I was right! Edited January 11, 2016 by shallowwatersailor 1 Share this post Link to post Share on other sites
WNYPCRepair 1,875 #65 Posted January 11, 2016 (edited) 6 minutes ago, shallowwatersailor said: Too much money, time, and aggravation on your part to have it mess up again. When you mentioned about the pulley and sprocket not lining up, I looked at your photo closely and compared it to the parts blowup drawing. That is where I noticed that the flanges needed to be inside. That along with my prior experience with my single stage flanges - and a PO! I was hoping that someone with a two-stage 79366 would pipe in to confirm that. And thankfully I was right! Yeah, once I took a closer look at the parts diagram, it was obvious. These old eyes are getting tired, I think I need real glasses now, the readers aren't doing the job. It also explains why there was 1/2" of grease in that little tray formed by the mounting bracket. When he greased it, the grease would come right out once it started to spin. It did it to me too, I just assumed it was the excess I hadn't wiped off yet. Edited January 11, 2016 by WNYPCRepair 1 Share this post Link to post Share on other sites
Charbs152 253 #66 Posted October 23, 2020 On 2/21/2012 at 10:16 AM, bk-scouter said: I was able to use the new bearings and lock collars just perfectly. Here are some pics.... Here's a Timken box with number in case anyone else needs to get theirs replaced too. Cleaned up the end of the shaft and ran an emery cloth over it. Installed the inner retaining plate and tapped on the new bearing. Installed the outer retaining plate and shot some grease into her to make sure it was full. Fastened the collar lock on the outside, reconnected the chain and relubed it and it's all set to go. Just have to wait for the BIG snow now ( yeah, right....) I noticed that these bearings have outer flanges that are an offset or concentric design in relationship to the shaft that they attached to, along with the inner flange of the locking collar too. Does anyone know why they are this way? Thanks. -BK Are the Timken bearings direct stock replacements for the 42 inch single stage blower? Share this post Link to post Share on other sites
gwest_ca-(File Mod) 10,498 #67 Posted October 24, 2020 That collar is what locks the inner bearing race to the shaft so the shaft does not rotate in the bearing inner race. There is an extra hole in the collar besides the one for the set screw. You use a pin punch in the hole at an angle to hammer the collar in the same direction as the shaft rotates when engaged. Then tighten the set screw. The eccentric of the collar locked to the shaft by the set screw is now jambed against the eccentric of the inner race so they turn together. Some 42" single stage use 3/4" shafts and the later went to 7/8" shafts. Garry Share this post Link to post Share on other sites