
Leaderboard


Popular Content
Showing content with the highest reputation on 05/20/2018 in all areas
-
12 pointsIt was a great day and I know we got some pictures coming. It was excellent spending the day with TerryM, DClark, Shynon, Prondzy, SmokinJoe, Jorden, WHX14, Achto and JoeBob. I got this picture for here and I took a few for the Wheel Horse Gallery.
-
10 points8 speed model # 91-12K802
-
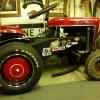
10 pointsIm bad at remembering to take pics, this is the only one i got, it caught my eye
-
8 pointsCleaned up my new 312-8 some and mowed the yard for the first time with it. I still need to do more detailing and decided not to use the bagger this time. I'm not a big bagger guy anyway. I also had to mow a little with the lawn ranger - can't let her get jealous😁.
-
6 pointsWe pulled the splitter out into the forest via the new path and bridge to split up a bit of red oak and some poplar. Some pieces of the poplar are 17" across. Had to walk down to the next little clearing to get the poplar. No tractor trail. 
-
6 pointsA few more vintage gems
-
5 pointsGood Morning Ladies & Gents; I operate a Small Engine & Power Equipment Repair Shop From my home in Bridgeport, Ct. Yesterday I started repairs on a 1984 +- Wheel Horse C-145 Automatic Lawn & Garden Tractor. I decided this would be a good candidate for a repair video series on my new Youtube channel. Since the repairs on this tractor are not the usual carb cleaning & belt replacements. Someone suggested that the Wheel Horse enthusiasts on this site might find this information useful and I hope that's the case. Problems I'm aware of and being addressed include........... Motion Works Linkages, Hydraulic Implement Controls, Brakes & Parking Brake, Mower Blade Mounting, and whatever else I find as repairs progress. Repair Video's have been a tremendous help to me on all types of things that I don't have a service manual for, and if this helps someone then the effort will be well worth it. As I post this there are 4 video's in the series. More will be added in the coming days. If you find the video's helpful please like, comment & subscribe, so I can mold the channel into a useful resource. It takes a lot of extra time to video document repairs, so it's good to know if it's worth it. This Tractor belongs to a repair client and is Not For Sale Good Luck With Your Repair Projects..........................Mike
-
5 pointsNot a true vintage picture but could be...
-
5 pointsThe C-100 should have a clutch safety switch, and a seat safety switch which will prevent starting if not in the seat with foot on the clutch. But if you are getting a noise from the starter, you must be getting power to it. With that model, when you turn the ignition switch, the solenoid should engage (making a click), and provide power to the starter. If the starter is turning but not engaging the flywheel, you may have a problem with the Bendix on the starter.
-
5 points
-
4 pointsModel # 1-0420
-
4 pointsThis was my first time at AJ's, There was a good turn out with some variety. I like to look for tractors that are not real common when I go to shows so I will start with those pics. There was also some great looking customs. The Allis WD & this Oliver 88 were extremely well done, Not sure what the thinking was behind this Minneapolis Moline labeled Bolens but it was kind of interesting. Some nice collections lined up. Some fast action shots of the slow race. This is a race that should be split into a gear jammer & a hydro class in my opinion. Jim & I were speed demons with our 6 speed 's in low 1, even after turning the idle down until the engine barley ran. Jim grabbing a little seat time on my Raider. It was great to see friends & to meet some new friends. I think Jim @WHX17 got a pick of some of the gang from RS. Hopefully we can make the trip again next year.
-
4 pointsGood weekend here. Commando 8 Battery charged and installed, fresh gas and a cruise around the yard. Still needs a bath. C-105 Tranny fluid swap, engine oil change, grease all the zerks, soap and water bath Craftsman GT3000 Engine oil and filter change, grease the zerks, two new spark plugs. Still needs a bath.
-
4 pointsBeautiful scenery once again. Must be awesome coming home to that all the time. That would definitely be a labor of love. Nice job.👍
-
4 pointsI know the sign says 1971, but the model #1-0401 is a 1972.
-
4 pointsCut a piece of electric wire. The braided type and unravel a single piece out of the braid. Different gauge wire has different size pieces of braid and you probably have some hanging around the house anyway. Plus it's copper and not as hard as steel wire and you can make it as long or short as needed. Works for me
-
4 pointsMy 1961 Wheel Horse 701 with hydro pump lift and two piece cultivator set.
-
3 pointsAfter 26 years in these "new" models get me all the time
-
3 pointsYesterday I mowed two yards with my 857, then I dropped the deck, adjusted the belts, cleaned it, greased it, sharpened the blades, then cut a third yard! Today, I started cleaning up the 654 I bought late last year to get it ready for the Big Show. Someone started the restoration on it 22 years ago. It was all repainted and ready for the engine and they quit. It sat in storage for almost 22 years. I don't have the heart to repaint it again as it was sprayed with factory Wheel Horse spray cans. The engine sitting on it is an H55 that I have for my 551 tractor, but trying to locate an Tecumseh H60 for it. Hopefully can find a decent one soon. Have to rework the hood as it has some bad weld repairs, Sunshine Red looks to be an almost exact match for the color that is on the rest of it. Came with a diassembled and blasted deck shell but no spindles, an RM-36X which may not be correct. Boxes of new Tecumseh engine parts but no block, a new 3 spoke factory steering wheel (not correct), cans of factory spray paint, Tecumseh factory service manual, and other parts have not even been through yet. All for the ridiculous price of $275!
-
3 pointsAre these Wheel Horse Cultivators ? The top one looks like a mid mount unit and bottom looks like a sleeve hitch . Any idea on the value ? Thanks in advance
-
3 pointsThis information from Brian Miller's site may be helpful. Information on Kohler (and most small engines) Charging Systems - Top of page First of all, the battery's only purpose in virtually any vehicle is to provide power to the starter motor to crank the engine and power electrical accessories when the engine isn't running. When the engine is running, and while the battery is being recharged, the alternator or generator then powers the electrical accessories through the voltage rectifier/regulator. With the engine running, and with a good working charging system, the battery has nothing to do with powering the electrical accessories. The ignition system also have nothing to do with the charging system. It's only purpose is to provide spark to the engine. The charging system and ignition system are two totally separate systems. One has nothing to do with the other, other than the charging system provides power to the battery-powered ignition system. A magneto or solid state ignition is a stand-alone system. It does not depend on the battery or charging system whatsoever. The Generator Charging System - The voltage-producing generating part of a starter/generator (or just the generator unit in an older automobile or heavy equipment machinery) produces DC (direct current) electricity. These are belt-driven and require a mechanical voltage regulator to regulate the charge to the battery and power electrical accessories (such as lights, electric PTO clutch, etc.) at the same time. The faster the engine runs, the more voltage and amperage the generator produces. And unlike a belt-driven automotive-type alternator, the generator is self-energizing. It will produce its own electricity when spun fast enough. A charged battery is not required. Although bulky, heavy and uses more space next to the engine, this system is reliable, but produce little- to no-charge at low idle speeds and are considered obsolete by today's standards. Also, this system require more horsepower from the engine than the alternator system while recharging the battery and/or under a heavy electrical load. The correct way to connect the wires on the starter/generator is as follows... Two wires connects to the [bigger] "A" (Armature) terminal on the starter/generator: A minimum 8 AWG wire connects from one of the big posts on the heavy duty starter switch or starter solenoid/relay to the [bigger] "A" (Armature) terminal on the starter/generator. This connection cranks the engine. A 16 AWG wire connects from the "A" (Armature) terminal on the voltage regulator to the [bigger] "A" (Armature) terminal on the starter/generator. (A smaller gauge wire can be used, but #14 is recommended for durability.) A 16 AWG wire connects from the "F" (Field) terminal on the voltage regulator to the [smaller] "F" (Field) terminal on the starter/generator. (A smaller gauge wire can be used, but 16 is recommended for durability.) Mounting base of voltage regulator must be grounded to engine or tractor frame. If either of the smaller wires is connected to the wrong terminal, the field windings inside the starter/generator will burn up instantly upon engine start up! But somehow, the starter/generator will still crank the engine. (Odd... ???) See the drawing to the right for wiring instructions. ä A starter/generator can be adapted to virtually any horizontal shaft or vertical shaft small engine with a fabricated mounting bracket and a slotted adjusting brace to tighten the belt. The starter/generator will need to be installed opposite the carburetor side of the block. They come in two rotations: clockwise and counter-clockwise. Starter/generators that spin clockwise came on older Wheel Horse, Sears Suburban, Bolens, or any engine that's started from the flywheel end. A counter-clockwise starter/generator came mostly on older Cub Cadets, or any engine that's started from the PTO end. A clockwise rotation starter/generator will need to be used if it's driven from the flywheel end. But if it's driven from the PTO end, it will need to be a counter-clockwise rotation starter/generator. If the wrong starter/generator is used, it'll crank the engine opposite of normal rotation, and not recharge the battery. If a starter/generator is belt-driven by an engine and used only as a generator to charge up a vehicle's battery and/or power 12 volt appliances or lights, the heavy battery cable won't need to be used. And there's about a 3:1 ratio between the starter/generator and engine. This means the starter/generator spins about 3 times faster than the engine. So the pulley on the engine will need to be about 3 times bigger than the pulley on the starter/generator to adequately recharge a battery and/or power 12 volt electrical appliances or lights. A starter/generator require a minimum 7/16hp engine running at a governored 3,600 RPM for it to produce a regulated 15 amps @ 13.5 volts. (15 amps x 13.5 volts = 202.5 watts x 2 = 405 = .4hp engine.) Read on the back label of the appliance you plan to use for how many amps it draws, then you'll know if the generator will be able to handle the load. But on a pulling tractor, if the engine isn't going to have a charging system, a voltage regulator and wiring isn't required as long as the battery is fully charged with a remote battery charger before the engine is ran again. Plus, the battery will need to be in a secure place, and route the wiring in a safe manner. Go here to learn how to repair a Delco-Remy starter/generator: Delco-Remy SG Repair.pdf. (require Adobe Acrobat Reader and use Google Chrome web browser for a faster download of web sites with large files.)
-
3 points8 speed model # 1-0360
-
3 pointsHowdy, I’ve been lurking for a few days since I bought the 315 in the picture. I’ve owned a couple of other Horses over the years but this is the nicest one. I don’t have a yard large enough to justify it but I couldn’t resist at 200.00. A little about me. I’m a Navy vet (71-79), a retired mechanic/water meter tech., I even worked at a Wheel Horse dealer in the late 80’s. I collect old tools and engines. As a result I have too many of both. The Wheel Horse runs and mows good but needs a few cosmetics. Like I said, I can’t justify it but I love having it. Jim ,
-
3 pointsWith the regulator disconnected you will get no voltage out put as the field coil isn't grounded. With engine running ground the F Terminal of the generator see if you then get some voltage output. if you do get voltage up around 14 v then you have a regulator issue. No out put then means something is still wrong in the generator....
-
3 pointsYou can get a remote oil filter kit for these engines off ebay. They come up all the time. Some cubs had them also. There is a plate on the lower crankcase that you change out for one that will have the fittings for oil lines. Mount the filter adapter where you want and run new hoses. I have two sets but have yet been able to find the time to put them on. Here is a page from the service manual. It would be a good time to put one on before you install the tins, which you can also get from the auction site cheap. Good luck.
-
3 pointsIts a Brinly bb-367 lift boom NICE SCORE!
-
3 pointsWell I just added a new seat to my collection. I wanted to try something new just to see how it would look . Not bad but I don't know if i really like it or not. A lot of work trying to sew pleats And letters. I really like the diamond design and may do one something like my first experiment As In The Last Picture but use a 1/2 sew foam to make them stand out.. But what do you guys think ???
-
2 pointsHappy Rainy Saturday, Made run up to Munson Mass and did some horse tradin with @snowhound . Got this GT1600 and GT2500 Anniversary. The 1600 runs, the 2500 needs a bit of work. 2 more Briggs powered 'Horses in the fleet! I also LOVE THE CAMO treatment on the 1600. Thanks Ed it was a pleasure. And I got outta there before Ben came at me with a kitchen knife ! Inside joke a few of us can understand espescially @Sparky Tony
-
2 pointsYes I still sell them on EBay. Sold 250 plus. Just like I the 1967 Lawn Ranger for the Tecumseh motor gas tank neck!
-
2 pointsOh boy looks like the "Misprint" Stevebo card will be worth twice as much for the few that made it into circulation
-
2 pointshttps://www.amazon.com/Lot-Large-Rubber-Grommets-Diameter/dp/B01NCIWGM6 Here is a listing for 2' rubber grommets, I'm sure most sizes are available. Most things used on old garden tractors were usually parts that were already available, not custom built for them. When looking for parts, sometimes just search for the size of the part, not just a wheel horse part. Randy
-
2 pointsThanks guys , my brother sent me the picture wanting to know if I was interested . Not sure where or how the owner wants . At least I got nice pictures of tractors with the attachments. Thanks Again.
-
2 pointsAre we sure that the Kohler 16 won’t spin up that deck? I’m not a fan of the Onans.
-
2 pointsWill do !!!! I have been around Wheel horse Tractors all my life, and spent a lot of time here looking things up.Its an awesome site, with a lot of wonderful people. Make America GREAT Again !!!! Thank you veterans!!
-
2 pointsParts manual is here part is 110780 still available from Toro or Check with one of our vendors A to Z tractors www.a-ztractor.com for a used replacement
-
2 pointsSide note: all the 8 hp WHs with shaker mount used the same engine as the non shakers, same oil pan, they just used four spacers to mount them to the shaker mount.
-
2 pointsInteresting I have an HH70 on mine and she starts faster than any of the Kohlers. Pull the choke out hit the starter as soon as she pops push choke all the way in and you can drive off even in winter.
-
2 pointsAny chance you bring an extra ride for Russ if he can make it? If not, I'll just have to booby trap your Commando while you're out shopping at the old lady trinket section looking for doilies and bicycles. With all the shelving inside the new vans I can only bring the bike. Plus they're only 6 cyl and no tow hitch. I'll move the calls to Monday, need a break anyway so count me in.
-
2 pointsHere's a link to the playlist for this video series. https://www.youtube.com/playlist?list=PL1CMZ6cMmtrCjNIU3oEobgl1VkGlgTEPu
-
2 pointsNice replacement engine What model Tecumseh is that HH60 or HH70??
-
2 pointsI googled for a pic, might find a manual online, i just posted one to give you an idea
-
2 points
-
2 pointsI'd say the Bendix also. It could be dirty and hanging up causing the starter to spin but not engage the flywheel. BUT, it could also be that it's not getting enough go-juice to engage it which could be from bad/dirty connections, bad battery......you get the point and the information above should get you going. Special attention to the battery cables. I just ran into this while working on my 76. The wiring diagram I was using was for the B and C series of that era but didn't specify a year. Why I downloaded it and didn't use the one that came with the tractor new I'll never know but something didn't look right. Then I discovered that I was using a diagram for tractors without a seat switch. It showed a single pole pto switch but I had a double pole with the additional wiring. I grabbed the original parts manual and bingo, the correct diagram. I kinda assumed that 76 could be the first year for the seat switch but wasn't sure so I just know did some research. 1975 was the first year for the seat switch. 74's didn't have them. So keep that in mind if you need to get deeper into the wiring. Verify the year of your tractor. Of course this is also subject to all the little quirks the Ponds loved to throw at us.
-
2 pointsRunning an engine under load with a leaned out mixture can overheat it and damage pistons and valves.
-
2 pointsMight just have to build one of these some day.
-
2 pointsSounds like a bad connection which in your case is an easy fix because there are not very many wires on the whole tractor. Disconnect the negative battery cable. Remove the negative battery cable and clean the terminals. Remove the positive battery cable and clean the terminals. Remove and clean the connectors and cable ends of the starter and solenoid. Remove the starter and solenoid and clean where they each mount to there respective places. Also, locate where the engine feeds the voltage regulator and clean there as well. Reassemble and try to fire it up. Keep us posted and we'll go from there.
-
2 pointsWas the carb really gummed up when you tore it apart ? If so ( as stated above ) the main may still be full of crud . I'm not a big fan of sticking a steel wire into a brass main . I would opt for a good soaking then a few blasts of carb cleaner followed by compressed air .
-
2 pointsNOS set here... same two bills.
-
2 pointsMy honey borrowed the B80 to move a little fire wood.
-
2 pointsWow things have gotten busy here at home but I have managed to find some more time to finish writing this thread. Next install the rings on the piston starting with the wavy oil ring then the two thin oil rings one above and below the wavy ring. These rings are easier to put on the piston, you have to take your time and walk them into the groove. Once you have them installed offset the ring gaps of the oil rings. I place the wavy ring gap above the piston wrist pin hole, and one of the thin rings to the left and the other to the right about 1/2" from the wavy ring gap. It is hard to see in this picture but I will show it in a later picrure. Now walk on the 2nd ring and the top ring. Use the diagram that comes with your piston for directional install of the rings. Most all of the rings have some sort of notch in them like the one below. Place the connecting rod in a vise wrapped in a towel, mark the orientation of the rod and cap with a marker. After you have marked the cap remove it, and slide the wrist pin through the piston and the connecting rod and install the two clips that retain the wrist pin into the piston. I measure valve lash next, small block kohlers use solid tappets so the valve lash must be set by grinding off material from the valve stems. I first check to see what lash I do have and then take the valve to the grinding wheel. When I have the gap close to spec I hand sand them in my tile with 600 grit sand paper. Then re check your lash with the camshaft lobe on the base circle of the cam this means that the tappet is in its lowest position. For those who don't feel comfortable doing this you can pay the machine shop to set this lash for you (they do have better grinders). So here is a picture showing the orientation of the ring end gaps for reference the piston wrist pin holes are in the 12 and 6 o'clock potions in the picture. This spacing of the rings makes it that much harder for the oil to "blow by". Heavily coat the cylinder wall connecting rod and crankshaft journal with clean SAE 30 oil. I usually use my fingers to apply it, then pour clean oil on the piston and the rings apply some oil to your ring compressor and squeeze the rings down on your piston You need to have the compressor tight enough to get the rings into the cylinder but loose enough for it to slide out of the compressor into the bore. Once again this style works just fine I have built enough engines that I have invested in a nicer ring compressor set. Line up your piston in the bore, note the orientation of the mark you made with the rod and the cap this will need to line up in a little bit. The other crucial thing is the location of the hole in the rod cap. THE HOLE MUST FACE THE CAMSHAFT SIDE OF THE BLOCK! if you do not do this your rod will fail. This is because of the rotation of the crankshaft and oil lubricating the crank journal. I turn the crankshaft so the rod journal is at its lowest point so the connecting rod doesn't smack into it in the next step. Using the handle of a deadblow or a wooden handled hammer make one firm and swift downward tap to put the piston into the block. If you don't get it in the first time make sure everything is lubricated and in the right positionand try again. You want to get it in one tap otherwise you run the chance of breaking a ring. Note the hole in the rod cap and it's relationship to the camshaft side of the block. Tighten the rod cap down to the spec in the kohler manual. There are two specs stated for some of the rods the first is a cap style which I used and looks like regular bolts holding the cap on, the other is posi-locked studs which the connecting rod has two studs sticking out of it and you The internals are pretty much done at this point. Install the valves you need your springs, valve keepers and retainer rings. Feed the spring and retainer into the block spring first the push it up toward the valve guide and over the tappet. Slide your valve into the seat, and using your valve spring compressor, compress the valve spring and retainer together When you have enough room, place the keepers on the stem. TIP: a small telescoping magnet, patience and a little axle grease goes a long way. When you have both valves installed properly turn the crank over by hand, so each valve has opened once or twice, you now know that the engine turns, and if the keepers arent on all the way they usually have fallen off by now and you will know. Install one of your breather gaskets (I apply gasket sealant on these gaskets) and then the breather plate and reed. NOTE the oil drain back hole is at the bottom. Place the rubber spacer, then the other gasket and the final cover with the nut, snug it down if you over tighten the nut you will bend the outer breather cover and oil will seep out. Lube up the points rod and place it in the block hole. Add your points (most all kits come with new points) Set the gap at .20" when the points rod is in the block the farthest it will go in during a hand rotation of the crankshaft. Bolt on your points cover, don't forget your gasket, and grommet, this can wait till the engine is on the tractor and wired, but mine will sit in the shelf for a couple weeks. Put on your head gasket, and head, torque to spec using a torque wrench, and install your spark plug. I personally do not use the spark plug that comes with the kit, I throw it out and buy a quality Champion spark plug, in the case of a small block kohler a J8C. Bolt on your engine tins and your almost done I still need to clean and rebuild the carb, after I do this tomorrow I will attach the govenor arm and set the governor.


.JPG.9f2ecb26065c66527b0730084ab7fc7a.thumb.jpg.7dc8a04d9a53d44ee2b23f26ee94496f.jpg)


.thumb.JPG.1b2a1a39cdcedb1e001571713350b32c.JPG)


This leaderboard is set to New York/GMT-04:00