
Leaderboard


Popular Content
Showing content with the highest reputation on 10/09/2015 in all areas
-
9 pointsLadies and gentlemen, It is going to snow tonight, so the time has come to assemble the team. Let's see what you have! Go ahead and snow. I am not afraid!
-
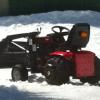
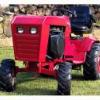
6 pointsWith all that snow removal equipment, no self respecting snow flake would dare to land on your property! I saw this at a tractor show today.
-
6 pointsThe loader is the best thing I ever bought. I use it for everything. It will never come off that tractor. I gave my wife three chioces: 1) A shovel and a push mower 2) Hire someone at $70 for every snow and mow 3) Let me take care of everything, but I get to buy what I need. She wisely chose option 3 And if you think that is excessive, you should see my fishing tackle!
-
5 pointsI don't hide WH since I only have a few, but my wife has not figured out that the tool or tools that I buy for each little project are not needed for the project. You don't need a bigger scroll saw to lay tile, or how many nail guns can you hold in each hand. Who has three Skil saws and two are industrial grade. Who needs a porta band when the have a portable metal cutting band saw.HA HA Of course how many women need 4 closets full of clothes ? All of them
-
5 pointsCame home to find my $5.00 Chinese carb came today... finally, was able to get the little Techy to do more than just pop off. Now, we just need to get the choke/ throttle cables, and fuel tank set up... and this Special 500 will be back to doing some business.
-
4 pointsJust got back from Scott's Meet and Greet last weekend with a couple of side trips on the way home. Indianapolis Motor Speedway Tour and of course Maker's Mark distillery tour, any time I'm in Kentucky, This was my first real Wheel Horse show and it was amazing! Many beautiful tractors. Scott and his family put on a great event. Met a lot of Red Square members and now can put some faces with some name. Everyone I met was very friendly and hospitable. Just what I expected. It was a little cold but even a wimpy Florida guy didn't think it was that bad. Still have my keister, Racing Bob. Did some trading with Jake with a 400 burb in some disarray for some 3 piece trans work. Jake and his dad, great people. If I ever do grow up I want to be like Jake. For a while it looked like I was going to be the one who came the furthest distance, but then I noticed some ladies who looked a bit out of place for a Wheel Horse tractor meet. I finally asked one of them where they were from and she said they had just flown in from California but were originally from China. Very impressive. Didn't sell my 520H wheel set or my steering wheel, nobody seemed too interested. That's when I noticed the truck bed looked empty so I bought another 400 burb with snow blade and a tub cart. Whats a guy gonna do. If we ever get a foot or more of snow in Northwest Florida, I'm set. Once, again I want to thank Scott and his family for putting this outstanding meet together, and I may be back next year! Who knows there may be someone from Australia next year since this thing has gone global! -Chris in Florida. Here are the pictures of the new burb.
-
4 pointsKC For some reason, I imagine the guy sitting in that seat at about 400 pounds. With a beer in one hand, and a turkey leg in the other! Redneck engineering at it's very best!
-
4 pointsIf I attend a gathering or show I feel rather obligated to bring home something greasy or rusty; otherwise she would be suspicious!
-
4 pointsI tell my wife I'm taking her to lunch at a restaurant that's not in town. She asks "Is there a tractor along the way"
-
4 pointsJimD and I were talking on Skype about bringing horses home and how many do you need, and we remembered this thread from way back. We thought we might bump it up and see if things are still the same with the newer members. So enjoy an oldie but a goodie.
-
3 pointsHad some wheel barrow work to do so I got the wheel barrow out. It is dirty and needs a good cleaning too. Marvin
-
3 pointsGreat collection,thanks for the photos.I just showed them to my wife and she seems a little more at ease with my collection which is no where near as numerous. Luck,JAinVA
-
3 pointsThe 24th works for me as well. My wife and I won't be bringing any tractors but I can bring something if you will let me know what is needed.
-
3 pointsI know, this air cleaner's decal is white. Gary, I agree. The Rupp decal isn't correct but, in my mind... those crossed winners flags seem like the perfect way to commemorate the Indy 500 Special.
-
3 pointsI'm about to use one of those decals on a 500 special dash. They are sweet! Make sure the dash is smooth as glass. Any imperfections will show right through. I cleaned mine up and painted it. I'll hit it with 400 grit before I put the decal on.
-
3 pointsNo I do not Think I have ever did that. But after sanding down the Shaft as you can see I have the new one on it was all the rust on the shaft from year of neglect. Take care. Gary B... Well I think I am all set now. I sanded down the crank with 80 grit paper.It was the rust on the crank from years of neglect being out side. Here is the new pulley. Cleaning the engine now getting ready for paint. Gary B...
-
3 pointsSee Dino, even long lost A.J. knows to pick the better team!!! I think even Koen knows better, Now!!! Mr Jim even took Iowa!! You might be the lone survivor on this one but let me tell ya, it won't work. Yup chalk up another one for brrly1, you gotta know I'm lovin' it!!!
-
3 pointsOk Im in for the S&G's... Sorry it took so long to get back here. I knew things were going to get Ugly after the Clemson loss, so I felt like now was the best time to get in here and help my fellow ND fan RacinBob!! Ohio St, Indiana, Iowa, Northwestern, Wisconsin, Minnesota, Michigan St and of course Notre Dame!!!!
-
3 pointsI pulled one of the bolts out of the trans when refilling. Dont recall having any issues. Mechanics tip 101 when replacing hard to reach nuts. (Perhaps old news to many) Take a small of paper and put it on top of bolt and press into socket. Bolt won't fall out of socket when trying to replace it. Sent from my iPhone using Tapatalk
-
3 pointsWelder! That big expensive thing I have on my shelf for occasions JUST like this... I'm a relatively new welder owner and I forget the wide range of uses for this wonderful machine. I went right out to the garage, hooked up my trusty Hobart Handler 140, did just as you suggested (though I had to knock it down one from the highest setting as I was getting close to going right through) and after once around it just took a light pry from the bottom and POP, it came right out. THANK YOU Garry! Now there should be some more progress on this thing this week. Stay tuned! (although it is just really another transmission rebuild... )
-
2 pointsWheel Horse B/C/D Tractor Dash Panel Restoration Tutorial How to properly restore a Tractor Dash Panel Wheel Horse Dash Panel Restoration Tutorial Originally posted by: MikesRJ - 03/06/2010 Click any picture in this article to view a larger version of the image Restoring old tractors (garden type or full-size farming equipment) presents the restorer with many challenges. Not so different from automotive or aircraft restorations, certain little tricks-of-the-trade are learned along the way which every restorer should have in their basket of tricks. The older a restoration subject is, the harder at times it is to locate a suitable "show-quality" part to complete the restoration. Sometimes you simply don't have a choice but to restore the part you have in hand because a replacement just simply does not exist. This how-to presents one of those tricks. The best part about this particular restoration technique it that it can be used on any part made of plastic, PVC, vinyl, leather, cloth or wood. The images above are of the Dash Panel before it was removed from a Wheel Horse C-160 Tractor, and after this restoration process was performed. Yes, boys and girls, that is in fact the same dash panel shown in both pictures. Excellent results can be achieved if you remind yourself to be patient, take your time, and follow the process presented here. Practicing the method on anything with raised letters beforehand also greatly enhances your chances of success. Simply follow this process on a "scrap" item and you should be ready for the actual piece in no time. PROCESS OVERVIEW: As restoration quality and New Old-Stock (NOS) Wheel Horse Dash Panels are harder to come by, it becomes necessary to restore what you have rather than replace the part entirely. This page is dedicated specifically to the restoration of an otherwise "good condition" dash panel that has been time-weathered, and return it to its original luster. Before moving on to restore your tractor restoration Dash Plate, it is HIGHLY SUGGESTED that you read through this entire article and perhaps try this method on a spare or "sacrificial" part beforehand. You only have one chance to do it right on your final piece, and a million ways to do it wrong along the way. As a side-note: This process can be used with very little variation on any tractor part which is made of vinyl, plastic, PVC, cloth, leather, or rubber. The VHT line of products is extensively used in the automotive/aircraft restoration worlds for returning anything made of these materials back to near original appearance. See more details concerning VHT Vinyl Dye products at this website: http://www.vhtpaint.com TOOLS REQUIRED: 1. Small bristle brush and Dawn Dish Detergent 2. 1/8" Metal punch and heating source (if making repairs) 3. 800 grit Wet/Dry Sand Paper 4. 0000 (fine) Steel Wool 5. Common Automotive Brake Fluid 6. Paper Towels 7. VHT Vinyl Dye, Gloss Jet Black (p/n: SP941) 8. Elmer's "Painter's" Opaque Paint Marker (fine & wide tip) 9. Dental Picks, Tooth Picks, and/or Exact-O Knife PAINTING TECHNIQUE: The white borders, letters, and symbols on the dash panels were originally manufactured using a screen printing roller technique. This method produces an extremely thin, opaque layer of material which is extremely strong and relatively long lasting. Since reproducing this technique is far more difficult for the "home restorer", the method presented here is relatively easy, and mimics the original process quite well. The technique I use is pretty straight forward and quite simple to do at home. In order to apply the thinnest coat of paint the tip of the paint marker should be as "dry" as possible, but still contain enough material to deposit on the surface. This technique is called "Dry Brushing" and is used by painters and modelers as a method for adding subtle details to whatever they are painting. For the purpose presented here we are using this method to apply the thinnest coat of material we can, in each successive pass over the surface. Once the paint marker is prepared for use per the package directions, the tip of the marker should be touched to a paper towel and dried off as much as possible before touching it to the part to be painted. When moving to the next paint area on your subject piece, re-load and re-dry the tip, then proceed. When painting with the white paint markers, insure the tip is about as wet as when using an artists "dry-brush" technique before touching it to the part. Apply the paint so it thinly "flows" over the surface, and use a paper towel to keep the tip "almost dry" of wet, runny paint between individual characters on the plate. Apply the paint with a very light touch in single passes only. Don't cover any more than a single pass at a time, building layer thickness with each additional coat. As always, follow the package directions for all of the products used in this process. When applying the paint, you are NOT wiping it onto the surface like a paint bush. You are also NOT trying to cover the surface completely in a single pass, rather you want to build successive layers, allowing each layer to completely dry, until an even and completely opaque coverage is achieved. If you attempt to wipe the paint onto the surface, you will produce "edge roll-over" and the paint will either bulge over the side edge of the surface, or run down the side, both of which conditions are undesirable. You should apply the paint in a very light tapping, or patting, manner where the tip is ever so lightly tapped onto the surface, moved over half of the width of the paint marker tip and tapped again; and the process continues from one end of the detail to the other. The only exception to this is when you are applying paint to long, continuous details such as the two border lines around the Dash Panel. These features should be lightly glided over using the dry brush method, from one end to the other end, and the tapping method is applied to finish the strokes at the very tips of these details. Aside from the method of application, the most important factor to keep in mind is that you are NOT trying to completely cover the underlying black dye color in a single pass. What you ARE trying to do is build-up multiple, very thin layers of paint until the white completely masks the black underneath. If done in this manner you are left with very sharp, crisp edges and an overall very thin opaque paint coverage of these raised dash panel details. The second most important aspect is that you insure your panel is well supported, i.e.: will not move during the painting process, while the heel of you painting hand is firmly planted on the work surface as you apply paint. This will insure the steadiest hand, and you will therefore have better control of the paint marker tip and where it touches while you apply the paint. Of third importance, as in any paint application process, starting off with a well prepared surface ALWAYS results in a higher quality final appearance. Complete and thorough cleaning, drying, repairs, and re-cleaning are all painstaking and necessary steps before applying any dye or paint to the surface. The instructions below go into greater detail where necessary, and if followed closely will result in a "better than new" looking part for your tractor restoration. Step 1: Thoroughly Clean the Dash Panel Here's where it started! Once removed from the machine, the entire dash panel should be thoroughly cleaned of all dirt, grease, oil, and old marking paint on all sides. Automotive Brake Fluid is a good paint and marking ink softener, but care must be taken to insure the brake fluid does not "melt" the plastic. I normally test the brake fluid method on the back side of the part, or on any surface which will not be seen when the part is re-installed, in order to insure the brake fluid will not attack the plastic material. Use the brake fluid sparingly, and allow it to sit on the surface at least 1/2 hour, to "loosen" any foreign materials (paint, ink, or hard stains) from the surfaces. Then with a combination of 0000 steel wool (try not to scratch the plastic), gentry scraping using the edge of an exact-o knife, and/or dental picks and tooth picks, you can easily remove all of the unwanted debris. Once all of the foreign matter is removed, the plate should be thoroughly scrubbed with a small plastic bristle brush and Dawn Dish Detergent. This will remove any remaining oil and dirt from the plate, the corners, and the edges. Rinse with warm water and allow the piece to thoroughly dry before continuing. Once it is completely cleaned it should look similar to the image below. Starting Point Step 2: Repairing Surface Blemishes This is the tricky part. If any surface blemishes exist, you need to make a choice whether to make a repair or leaving it as-is. Obviously, starting with a high quality unblemished panel is more desirable, but you may not have a choice but to use a "less than desirable" piece due to replacement part availability. Attempting to repair any surface issue may only result in a far worse appearance than leaving it alone. Choose wisely based on your abilities. Only one surface blemish was corrected on this example (the second "N" in "IGNITION"), the second blemish (the "wiggle" in upper left corner of the Electric Clutch "OFF" arrow-bracket) was left alone as it was too dangerous to attempt repair without further damage. The right side of the "N" was smashed down and the right "leg" of the "N" was partially split in two. A small round punch was used to "re-form" the letters edge by heating the punch tip to just below the melt point of the plastic, and "pushing" the letter back into shape. The split essentially closed up and re-bonded to the adjacent part. Care must be taken to not overheat the punch as you do not want to melt the plastic, only make it soft so it will "move". Once repairs are completed, re-clean the part as you did in Step 1. Step 3: Restore Plastic Color and Shine Many products exist which are designed to restore vinyl and plastic to their original luster. I have used many of them with varying results. VHT (A division of Dupli•Color, Inc., a Sherwin-Williams Company) produces a vinyl dye which comes in several colors, and in Gloss and Flat finishes. The product is NOT A PAINT, it truly is a dye designed for vinyl, plastic, cloth, leather, and wood. The vinyl dye, when applied to plastic, forms a polymer on the surface which actually transforms the plastic material surface into a new material matrix. I prefer the look of the hi-gloss finish as it makes plastic parts look more realistically like a "new part" than does the satin finished dye. VHT Vinyl Dye, Gloss Jet Black (p/n: SP941) in the 11 oz. aerosol was used to treat this Dash Panel, which only required a single, light coat to restore the dash panel to its original appearance. NOTE: Allow the dye to absorb and surface-dry at least 4 hours before proceeding to the white painting process. Step 4: Applying the First Coat of White Paint Applying the white paint is rather easy, but does require a little technique and a steady hand. For this step I used Elmer's "Painter's" Opaque Paint Markers (available in most craft and hobby shops). The markers come in several tip-sizes, I used the fine and wide tips here, and is composed of an opaque acrylic paint. The acrylic paint bonds extremely well to the dyed plastic, and holds up to temperature variations and the weather quite well too. LARGE PANEL DETAILS: When using the paint markers, do not press down with any significant force while painting. The driest tip (artists "dry-brush" technique) and the lightest touch (the least amount of downward force) on the plastic produces the best results. Using the wide tipped marker, dry the tip on paper towel and very lightly cover the large borders with a single pass. DO NOT go over them a second time, as doing so will leave "brush marks" in the paint. The result should be an almost see-through appearance of the white paint. Several coats will be necessary, so if the black shows through, leave it alone. Also, "paint" any large details on the face area; such as the choke symbol, large letters, rabbit and turtle; using the wide tip paint marker, but use the "PATTING" paint method described below for these smaller details. SMALL PANEL DETAILS: As before, you are applying a very thin coat, so make sure the marker tip is almost dry and apply only a very thin coat on the first pass. Using the fine-tip paint marker for lettering and small details, use a patting (or tapping) technique to apply paint to the tops of the letters. Begin at one end of the letter and overlap your taps, moving toward the other end of the letter. Don't wipe the paint on, PAT it on! Especially at the ends of the letters. This keeps the paint from "rolling over" the edges of the raised detail. Dry the tip on your paper towel frequently, and between every new detail painted. NOTE: Notice the black showing through the white in the image below. Keep the first coat VERY, VERY light. Step 5: Apply Additional Coats of White Paint ALLOW AT LEAST 4 HOURS BETWEEN COATS The application of paint continues as described in Step 4 until all of the painted areas are completely opaque and covered well. With each pass you will see the paint begin to almost "pool" on the top of the surface. As the paint dries it will flatten out to a nice even coat. The desired result is normally accomplished in just two to three coats of white paint. If you have blotchy or spotty coverage, you can use 800 grit wet-dry sand paper to lightly sand the white faces flat and even the paint coverage, then apply a final top coat after re-clean and dry the part. Make sure you allow the paint to dry thoroughly before sanding, and re-clean the part before applying the next coat of paint. Make sure all surfaces are evenly covered without brush strokes. The image below shows good coverage with very little over-painting or edge "rolling" after only two coats have been applied. Some letters and small details will need to be scraped and cleaned up prior to applying the last coat of white paint. Step 6: Finishing Up The final step in the process is to clean up any mistakes or over-painting (edge-rolling). This step is normally done BEFORE the last coat of white paint is applied, so that any scrape marks or edges can be covered on the final pass. I normally use dental picks, tooth picks and/or the tip of an Exact-O Knife to clean any edges which were over-painted or where errant paint has been deposited between letter lines. Any over-paint on the panels surface can be covered up by spraying some of the VHT dye into a small cup and using a fine tipped artists brush to "dry-brush" the paint drip into oblivion. Once the final coat of white marker paint has dried for at least 24 hours, crumble-up a piece of regular kitchen paper towel and buff all of the white painted details. The paper towel material is just course enough to polish the top surfaces and burnish the edges of the white details, giving your panel a "finished" look. The polishing will also remove any specs of dust which may have settled on the surface during drying time. Your piece will now be remarkably similar to an original new part, and is ready for installation on your pride and joy machine. The completed piece is now "Show-Ready" and looks like the images below. My thanks go out to Bob Maynard ("RMaynard"on the Red-Square forum) for the use of his B-80 dash panel in the creation of this How-To. Bob mentioned somewhere on the bulletin board that he was in the market for a NOS Dash Panel for his B-80 restoration. He also mentioned that he had an old usable one in-hand, but did not think it was show-quality enough for his restoration. I offered to restore his old panel for this tutorial, with the thought that he could perhaps use the result on his B-80 should he not find a suitable replacement. I hope you enjoy the tutorial, and Bob; Thank You for allowing me to use your panel for this example.
-
2 pointsFound a C-175 that I'm going to go look at today. She "the wife" has no idea that I'm am. Let you no what happens later. If I get it I might hide it at the neighbors. Details and pics to follow later. Wish me luck :)
-
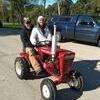
2 points...well...actually, very gifted indeed, considering the Joisey Hawg Glenn passed this gorgeous example of a '68 500 Special on to me today. All for just the price of gas to stop by and pick it up...what do you think, was my lucky day, or what? As you can see, I'm pretty happy, was a really great time hanging out with Glenn and the boys this afternoon.
-
2 pointsThings are starting to slow down now. While thinking about whether to use ATF or oil and conventional vs synthetic, I made the decision to go ahead and proactively change the axle seals. So I am waiting for them to arrive. Not sure if there is a right way to reassemble one of these but I decided I would work from back towards the front and bottom to top. As such, I don't want to clutter up the area I'll be in doing axle seal swap. I did decide to put the two frame uprights on and installed the shift lever. Ended up having to use bushings as the side plate holes had elongated which is pretty common from my forum research. What is likely uncommon is my jury rigged bushing installation. I opted against welding steel ones in place mostly due to how difficult it would be to get them and resize. No lathe. So I used oil impregnated bushings I located at tractor supply. The collars to lock them were too wide and I had to come up with another way. I took a small drill bit and drilled 6 or so shallow indentations on the inner side. Then I used steel stick JB weld to wrap around and and basically made a semi permanent lock ring. If I ever need to replace the bushings, it will be very easy to drill out the bronze bushing. Kind of cluged but effective and can't be seen from the outside. Hope to have seals tomorrow for axles. Then I can install the seat base and the 3 point onto tractor.
-
2 pointsPush it; Blow it; Pile it up; or give it the old brush off! You got it covered.
-
2 pointsMy wife thinks I only have two she does not realize I have a third also in pieces. She thinks the two are one too many.
-
2 pointsWell they played pretty well against GA Tech's option, Im hoping it carries over to Navy. But you are 100% correct. Something about Navy and Notre Dame. ND could be the best team college football and Navy could be 127th, they still would play them close or take it into triple overtime..
-
2 pointsDon't be sorry Richard...it is true about the sawdust.
-
2 pointsYes, Mikes tutorial is good and can really spruce up your panel. Hah! but I tried it and made a mess of it! found pretty quicky it takes a STEADY hand! and my old creaky 75yr old nerves just wouldnt cooperate, but, I coaxed my son into trying it and it turned out NICE.
-
2 pointsGlad to have you back AJ. I've been battered and beaten by these Big 10 guys but I'm still hanging in there. It looks to me like it's gonna get a lot tougher to pick em now that conference play is in full swing. Something about Navy scares me too this weekend. They usually give Notre Dame fits. Being 4-0 and putting up quite a few points.................. I'd sure like to see them play Clemson in better conditions but they had to deal with the monsoon too.
-
2 pointsC'mon now... If a Techy don't smoke that can only mean that there is no oil in it! A little smoke just lets you know she is still alive and breathing.
-
2 pointsGot an ark welder? Run a heavy bead around in the ball groove and when it cools the bearing will fall out. Garry Adding - The last couple I did I used a mig welder set at the high end. If the race turns red hot you got it right.
-
2 pointsHAH!! boy these horses can have some stuck on pieces - steering wheel/hubs come to mind. I had a hub in a situation similar to yours - I had got to the point where I said (between a lot of *&%#&^) that I was gonna get that *&%*^$ piece of &^%** off if it killed me!! I had the slot cut in it like you and it still wouldnt budge, I ended up cutting a 45 degree chunk out and it finally came off -- dangest thing. Course axle was ruined too...
-
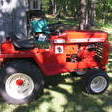
2 pointsI finally got the weights mounted. I had to do alot of grinding and had to cut the little alignment studs off. The weights fit inside the rim much better and don't have so much overhang. Thats what I wanted to achieve so I wont get hung up on things and it's less stress on the bolts holding them on.
-
2 pointsDefinitely Mike...engine, and rims.... was just looking at decals, hate the original balloon... thinking the crossed flags here are the perfect fit for the theme of this , even if not factory correct.
-
2 pointsI think, I'm really starting to... take a shine to this 500 Special survivor here.
-
1 pointI bet that hing will move more snow than you think! You can use the deck to blow the light snow falls fron the side walk
-
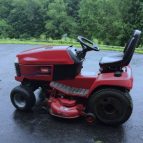
1 pointI like it but what kind of mower is it?
-
1 pointMost of the stuff i drag home sneaks it's way through the narrow path beide the shop. It stays there for a day or two before i start doing stuff to it. By that time my parents ask where the hell that "thing" came from. Most of the time the answer is i allready had this. They are getting suspicius tho since the small engines and parts of mowers are starting to pile up
-
1 pointLove your 520's!! I plow with my 2 520's! I would like to get a kiwk way loader for one of them some day.
-
1 pointLove it! Will you soon have chains on the blade tractor?
-
1 pointWell, we ended up with 6/10ths of an inch of rain at my uncles farm. I would've preferred it to be dry leading into our plow day. However, the weather tomorrow and Saturday is supposed to be really nice. So, we are still on for the plow day and just plan on getting your tires muddy! Looks like there will be plenty of GT's around if someone gets really stuck and needs a tug to get out! Feel free to bring tractors to plow with or to just show off and ride around to view the plowing and farm. The fall colors are really starting to pop and the farm has woods I'm nearly every direction. Don't forget your cameras! We look forward to seeing you there. again the address is 3818 Ferry Lane Omro, WI
-
1 pointI thought I was the only person that had to fight stuff like this. Some things will fight you to the bitter end, but persistence will prevail!
-
1 pointGood Job//!!!!!!!!!!!!!!!!
-
1 pointLook out @vinylguy you have some serious competition!
-
1 pointI took pictures but like I said, the camera auto adjusted for low light. First is just daylight through the man door, second is the LED bulbs, third is the fluorescents. In the last two, the shadows tell the story. In reality, the LEDs look like the first photo, and the HO fluorescents look like the last photo.
-
1 pointHere is what happens.. Some guy really wanted it and his PayPal account had the dough in it, probably from small stuff he sold that he really didn't care about so he stepped up. I have no issue with that. Here's the problem, now every clown out there thinks that is what they are now worth. Doubt that, at the end of the day its just a giant paper weight.
-
1 pointRegardless of the oil filters physical location, it feeds the low pressure charge pump oil into the actual hydrostatic pump on the transmission (it is not connected to the sump so the level of the filter doesn't matter), so you may get some leakage from the pump/hoses but once that is cleared it will vent so you can safely refill with the oil pump loosened/off. This is the eaton 11 connection diagram:
-
1 pointNo lighter? All the Racers in the 60's smoked like chimneys!
-
1 point


This leaderboard is set to New York/GMT-04:00